
There are countless reasons why you should be carving pumpkins every year! It is a fun and to get in the spooky holiday spirit and an easy way to add some DIY Halloween decor to your home. It is a great activity to connect with your kids, but it is also enjoyable for anyone at any age! Whether you want scary pumpkin carving patterns or something sillier, we’ve got some ideas for you.
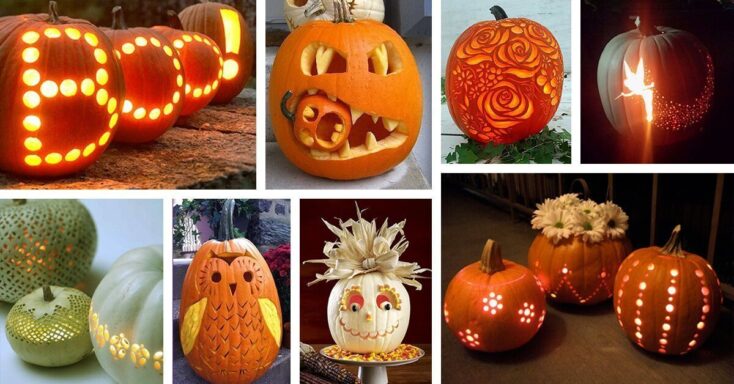
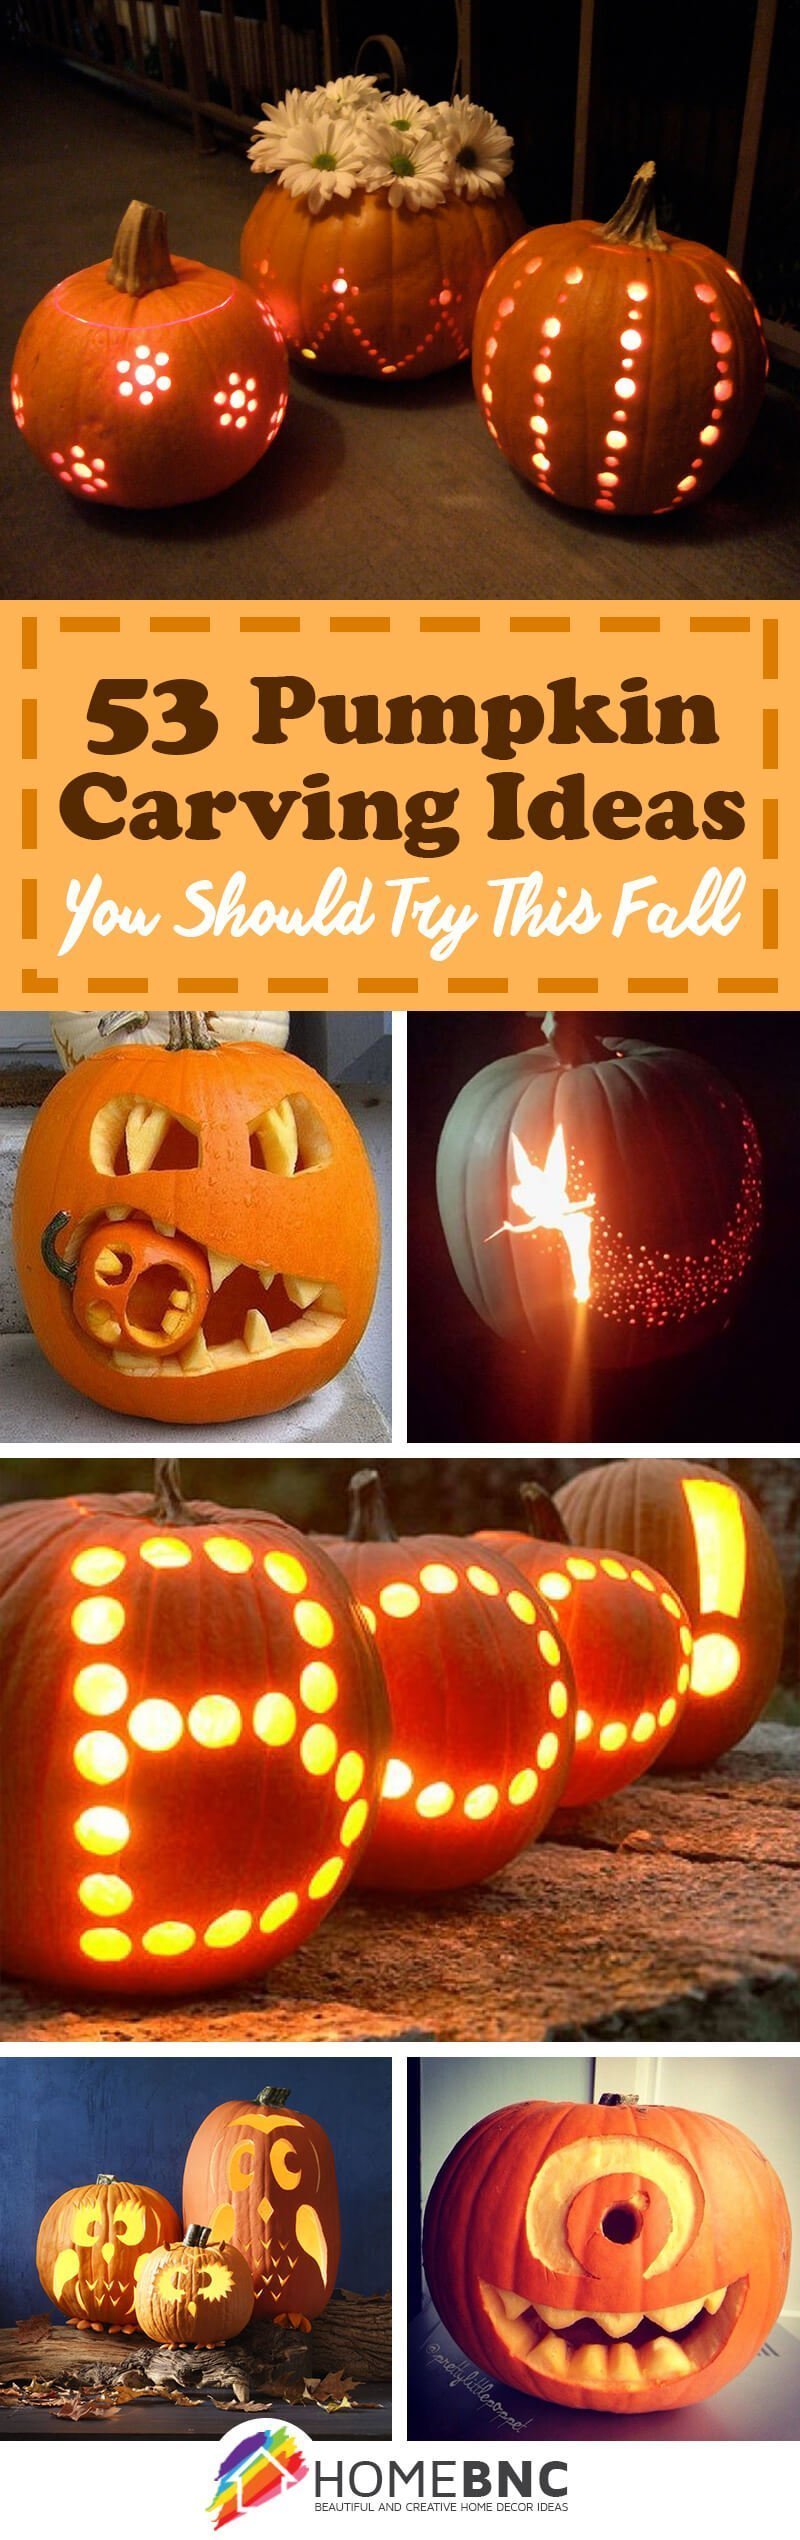
53 Sweet Pumpkin Carving Ideas You Don’t Want to Miss
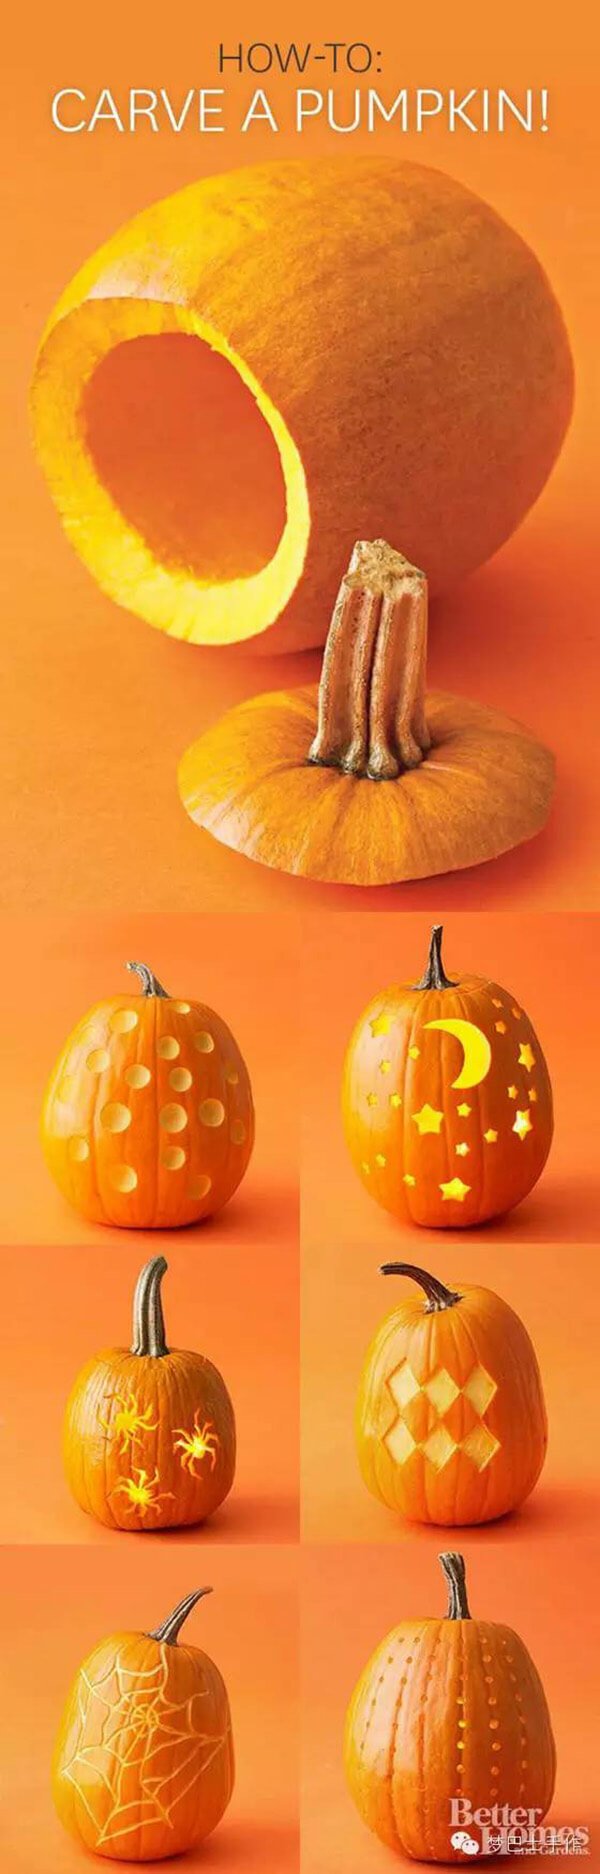
How To Carve A Pumpkin
The first thing you’ll want to do is choose a pumpkin that will fit your design. Make sure you have all of your tools including a serrated knife, a large spoon, and a carving saw and other carving tools.
Once you have your pumpkin ready to go, cut the top off with a serrated knife. Next, you’ll need to scoop out the seeds with a large spoon, as well as some of the sticky fibers and flesh. Throw all of that away unless you want to save the seeds for eating.
Now you’re ready to get carving! If you’re using a template, you can tape the paper to your pumpkin and use a sharp object to punch holes along the template lines. Remove the template and carve along the dotted lines. You can also place tracing paper underneath the template and tape them on. Use a pen to trace over the template and then remove it. Carve over the traced lines to create awesome Halloween decor! Adding a tea light candle in the center will give your pumpkin that classic Jack-o-Lantern look.
Check out these great pumpkin-carving templates for inspiration!
1. What a Hoot!
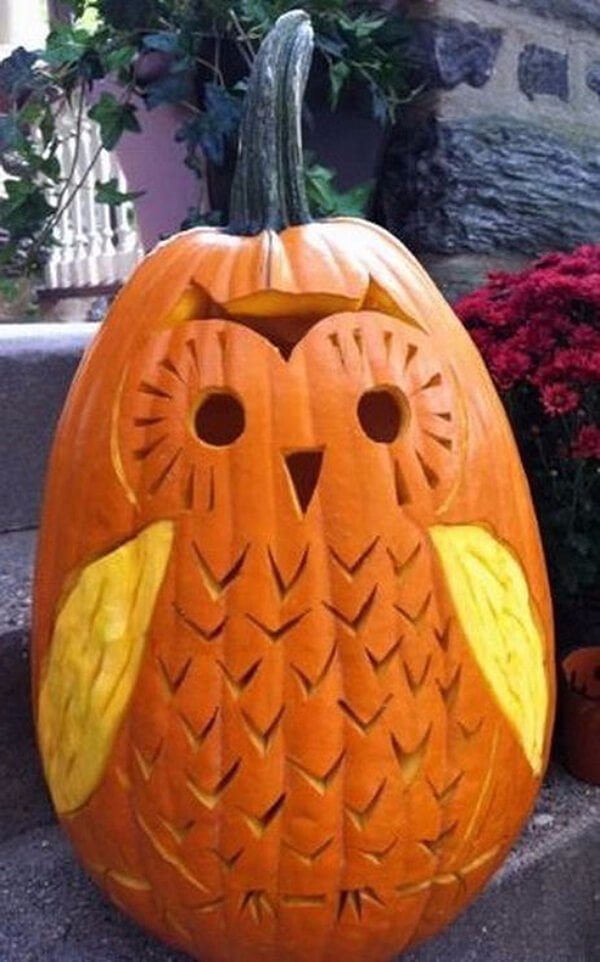
This owl pumpkin is easy to make even if you don’t have a template! Carve in basic circles and a triangle to create the eyes and the nose. For the body, add several V’s fairly close together that resembles an owl’s feathered look. It is not necessary to fully carve out the wings because you want them to have a different color and texture than the rest of your pumpkin owl.
2. You Name It
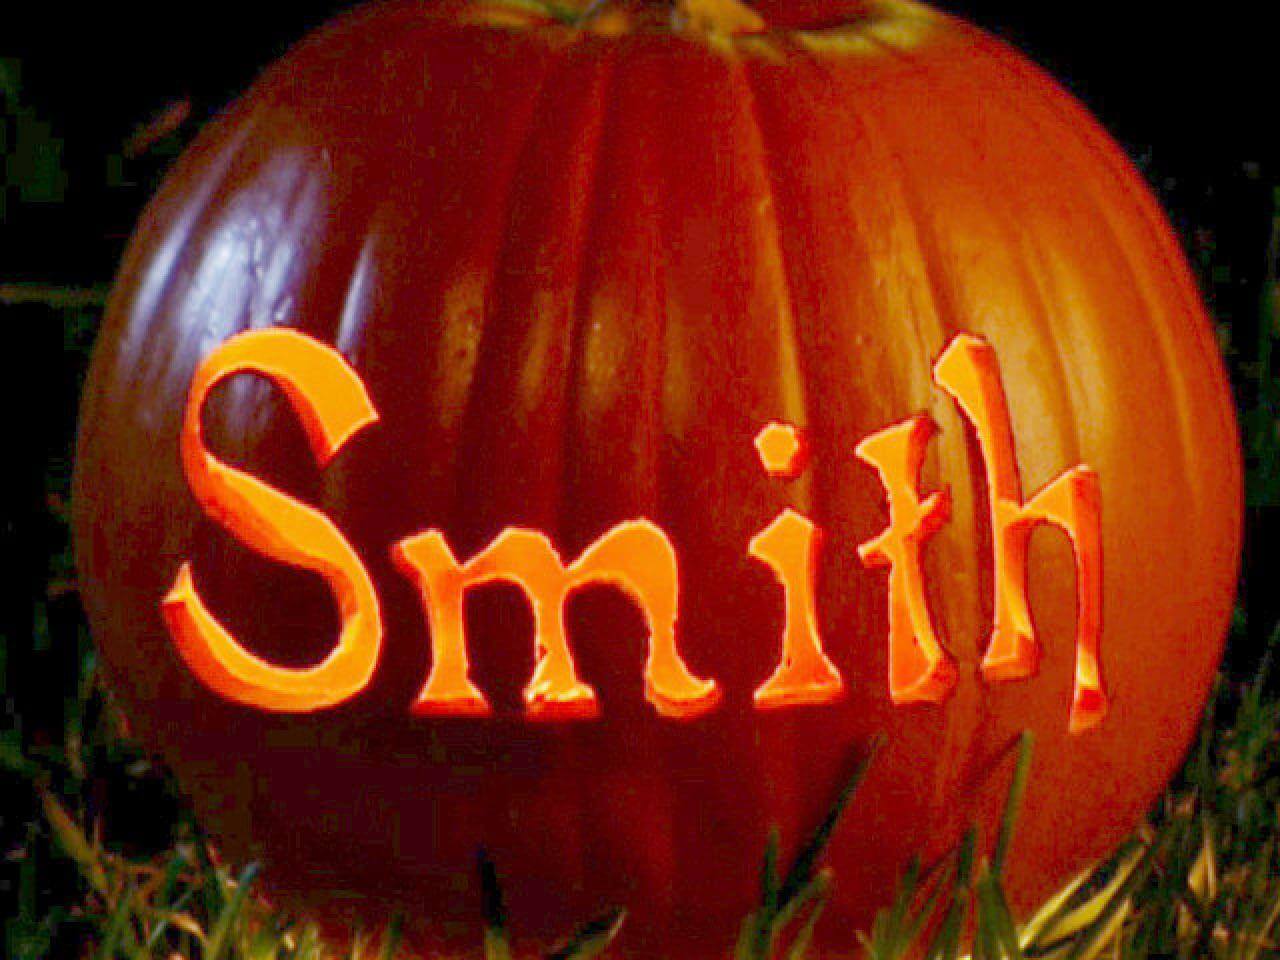
A classic way to make your homemade Halloween decorations unique is to simply add your name to the pumpkin. You can use lettered stencils to put this on or you can draw up your own design, draw it one, and carve it in. This is the perfect design to put right outside the front door or on the front porch. The candle in the middle will really make your name stand out.
3. Hungry Monster

This might be a bit more difficult than some of the others on our list, but will look fantastic with a little bit of effort! You have two pumpkin faces to carve, but the smaller one is simple. You just need to carve wide eyes and mouth to create a frightened look. Make the mouth of the larger pumpkin wider at one end and make sure that your small pumpkin can fit inside.
4. Easy Spelling
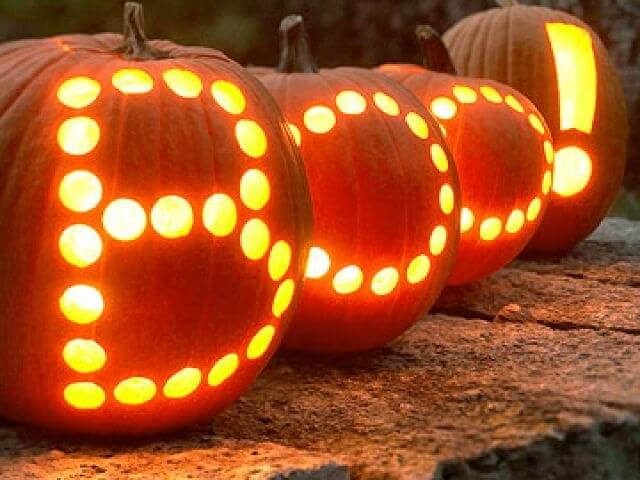
This is another one of our easy pumpkin carving ideas. Although you’ll need several pumpkins to complete the look, the actual carving part is simple! Write a letter on each pumpkin and put them together to create a fun Halloween word. These letters are comprised of tiny circles. You can either draw the circles on or use a circle stencil. You can also choose your own design for the letters.
5. Carve Your Pumpkins With A Drill
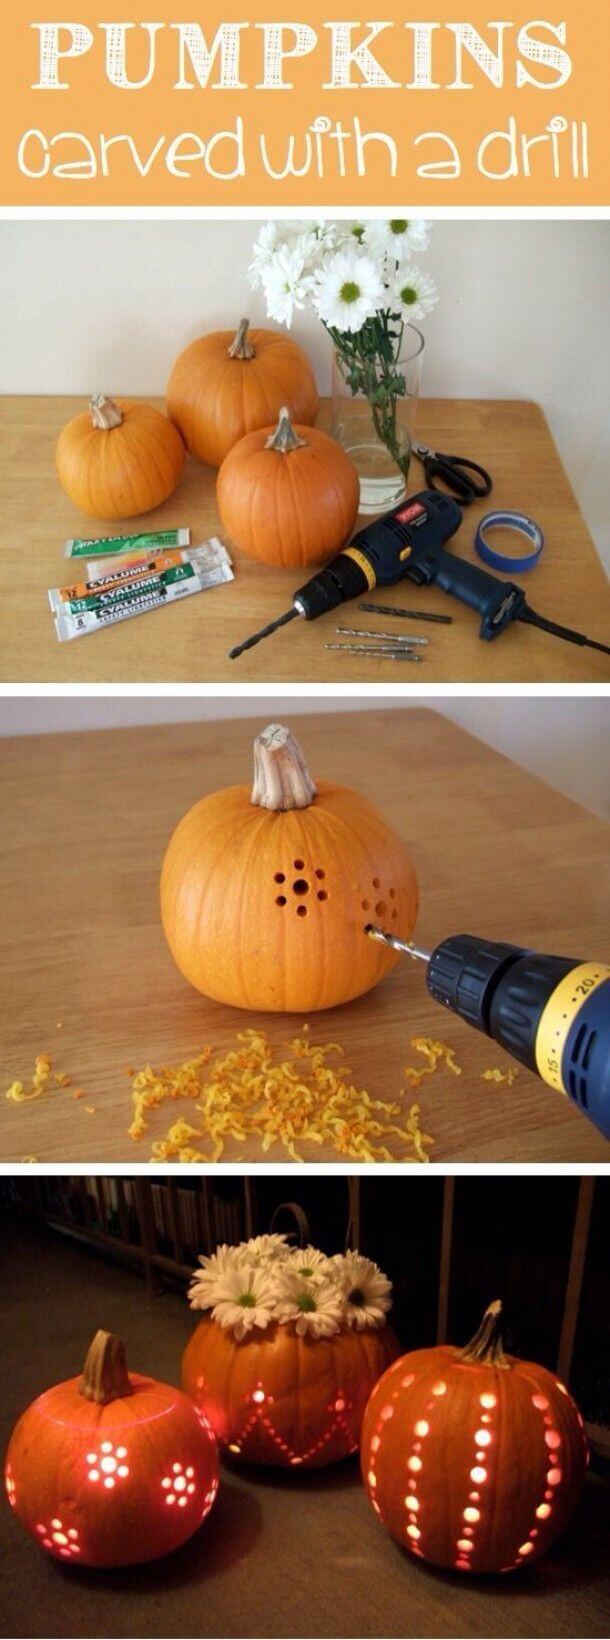
If you’re looking for a new and innovative way to make these cool Halloween decorations, try a drill instead of your carving saw! You can use a drill on most pumpkin sizes but may want to change your drill bit depending on the pumpkin size. Masking tape can be a helpful tool to use as a guide when you are making a repeated pattern. These are a great idea if you want to keep your pumpkins out during the entire fall season, not just Halloween.
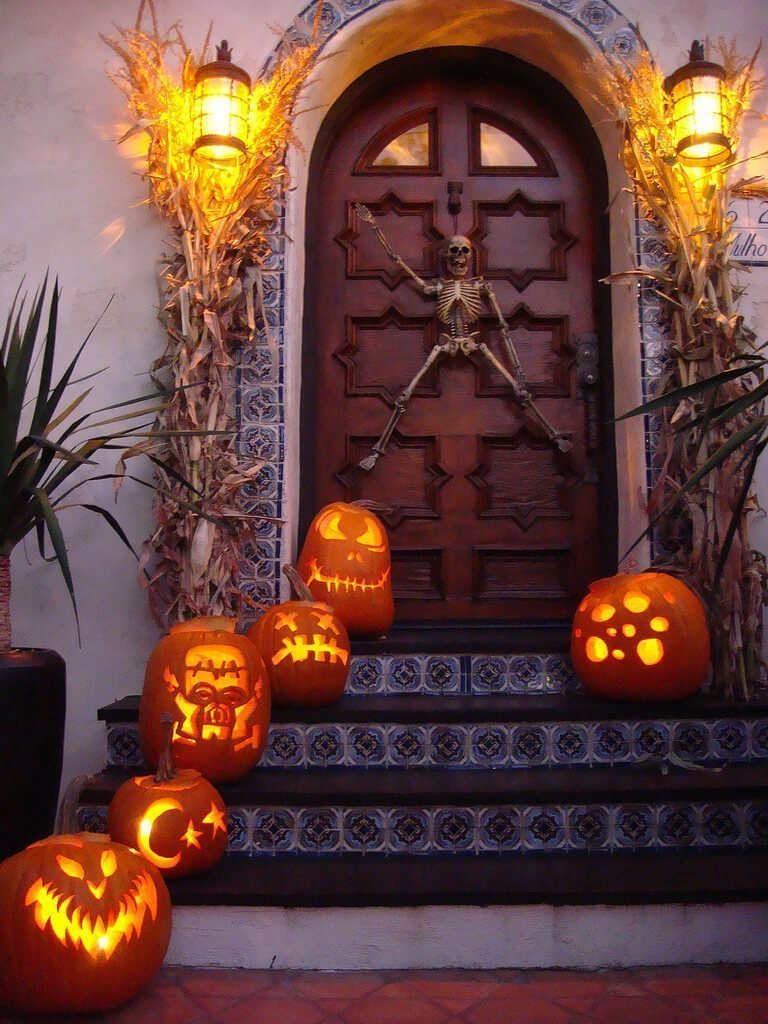
6. Jack Skellington Inspired
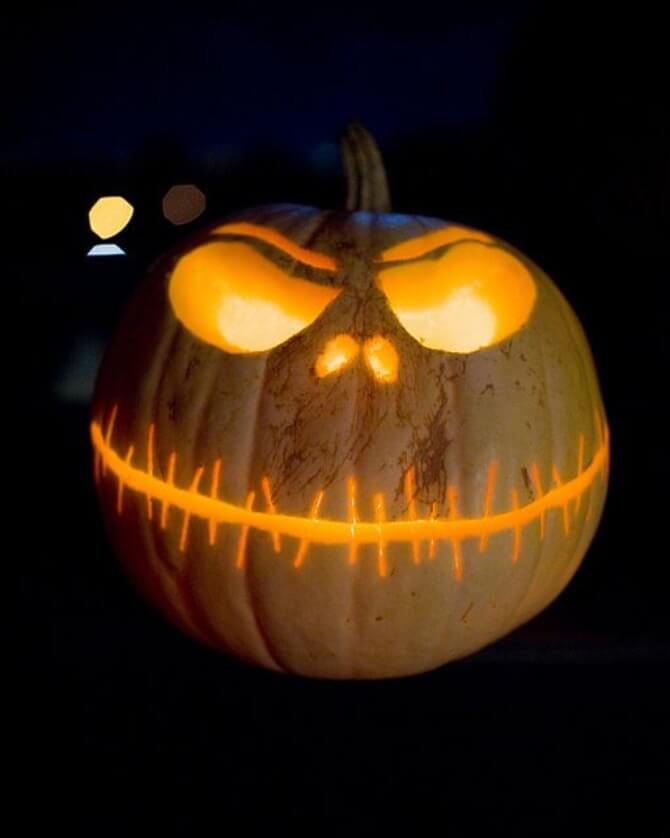
If you want scary pumpkin carving faces, try this one. It’ll definitely scare away some unsuspecting trick-or-treaters! It is pretty simple and you most likely won’t even need a template. The mouth requires a deep, straight-line carving across the front. Add haphazard, tiny, vertical lines through the mouth for a stitched look. Make sure you carve in eyebrows to match the eyes for a truly evil face.
7. Open Top Pumpkin
With this unique design, you don’t put the top back on your pumpkin after cutting it with the serrated knife. You would carve a design into the top of the pumpkin, in addition to the face. Although it is a bit more work, the end result is gorgeous. A simple floral or geometric pattern will look best with this style. Putting the candle inside will illuminate the front and the top beautifully.
8. Angler Fish Pumpkin
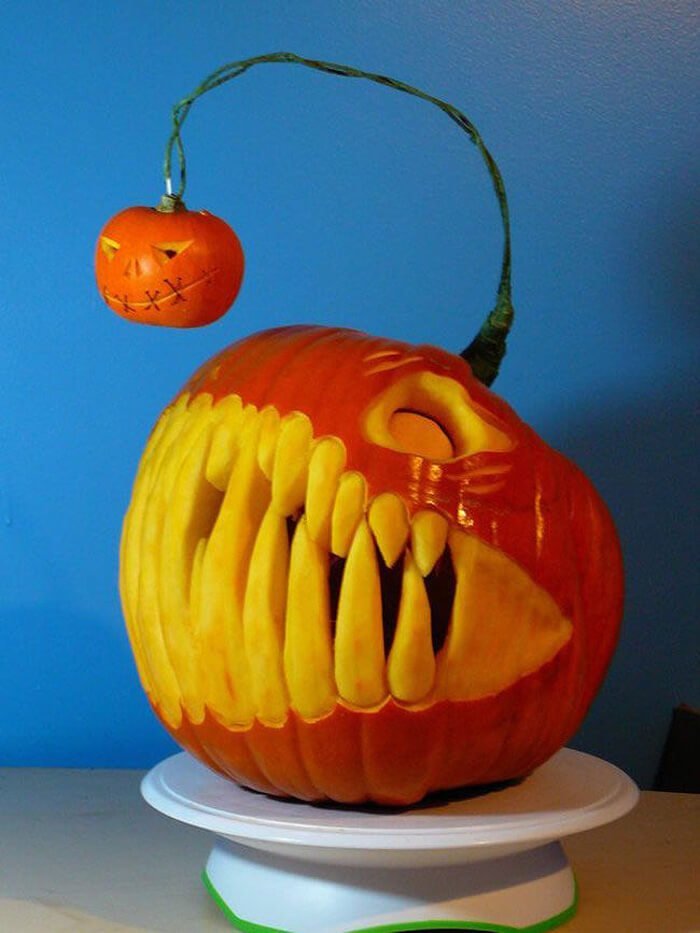
This is definitely one of our more difficult pumpkin carving templates, but it’s a chance to show off your artistic talent! You will need a large pumpkin and one of the smallest ones you can find! Attach the smaller one to the larger one stemming from the top. There are a few different ways to accomplish this. The face on the smaller pumpkin can be pretty simple because you’ll need to spend more time focusing on those monstrous teeth!
9. Fairy Dust
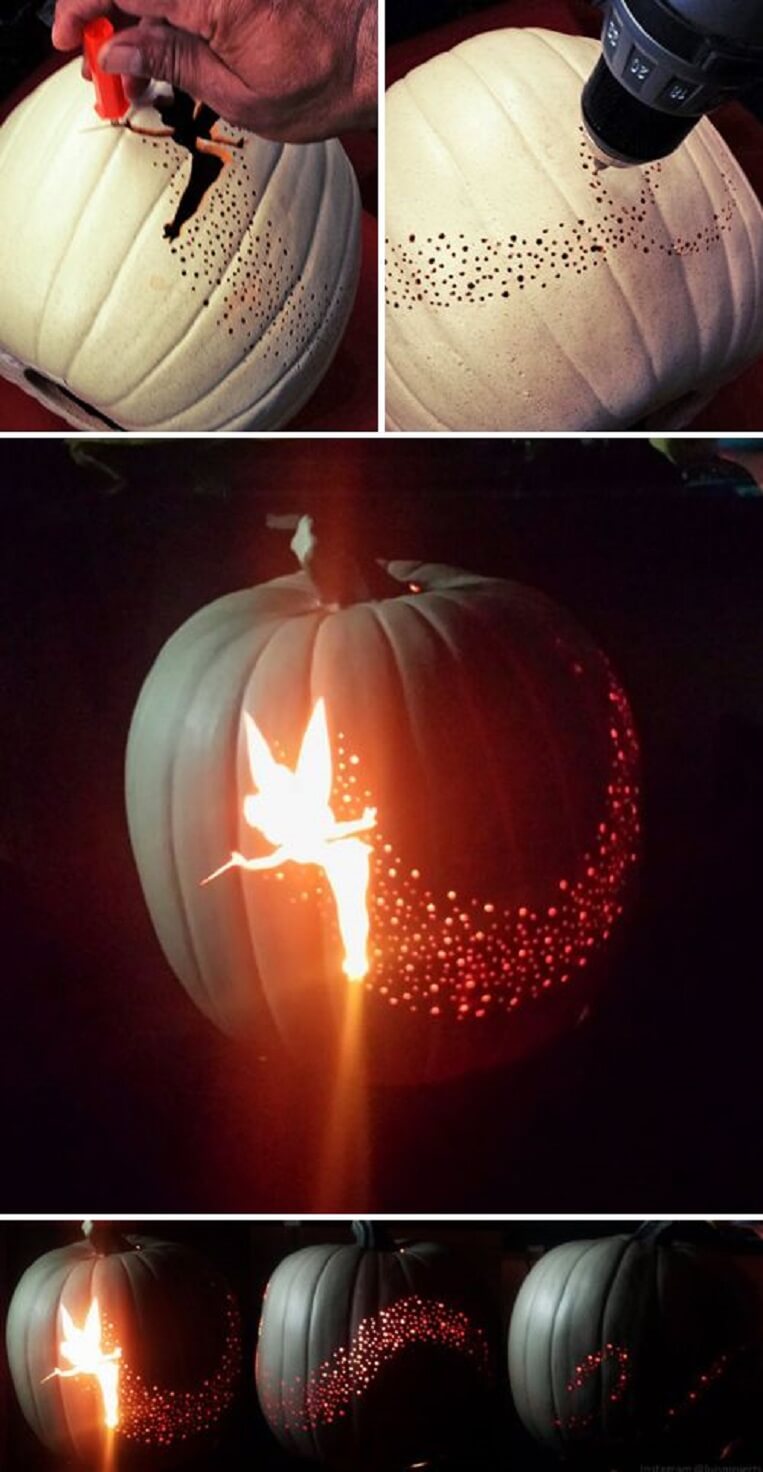
This Tinkerbell-inspired pumpkin is a great option for those Disney lovers! A template is probably the best way to put the fairy on. You’ll need a very precise carving tool to accurately create this look. After your fairy is carved on, you’ll want to add the pixie dust. It should be a collection of stars and sparkles underneath the fairy, but you can get creative with the actual design of the pixie dust.
10. Golden Geometric Patterns
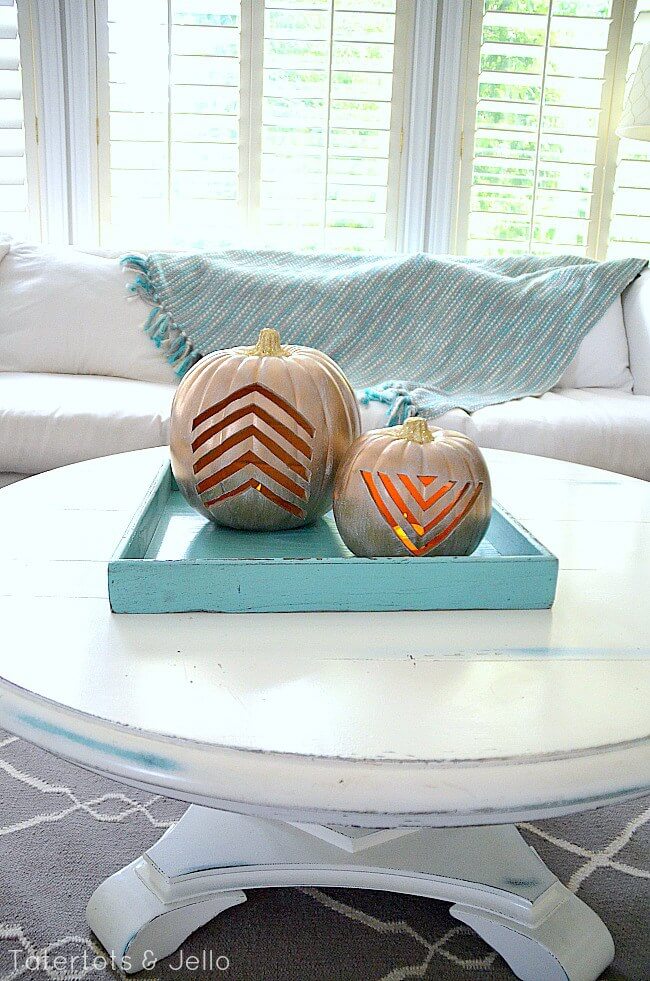
This fall-themed pumpkin is the perfect choice for you if you’re looking for an elegant look instead of a spooky Halloween one. In addition to your regular carving supplies, you’re going to need some gold spray paint or gold glitter. You’ll want to carve first using a geometric stencil. If you are happy with the pattern, the next step is to spray paint it gold. If you really want to kick it up a notch, add the gold glitter.
11. Minions
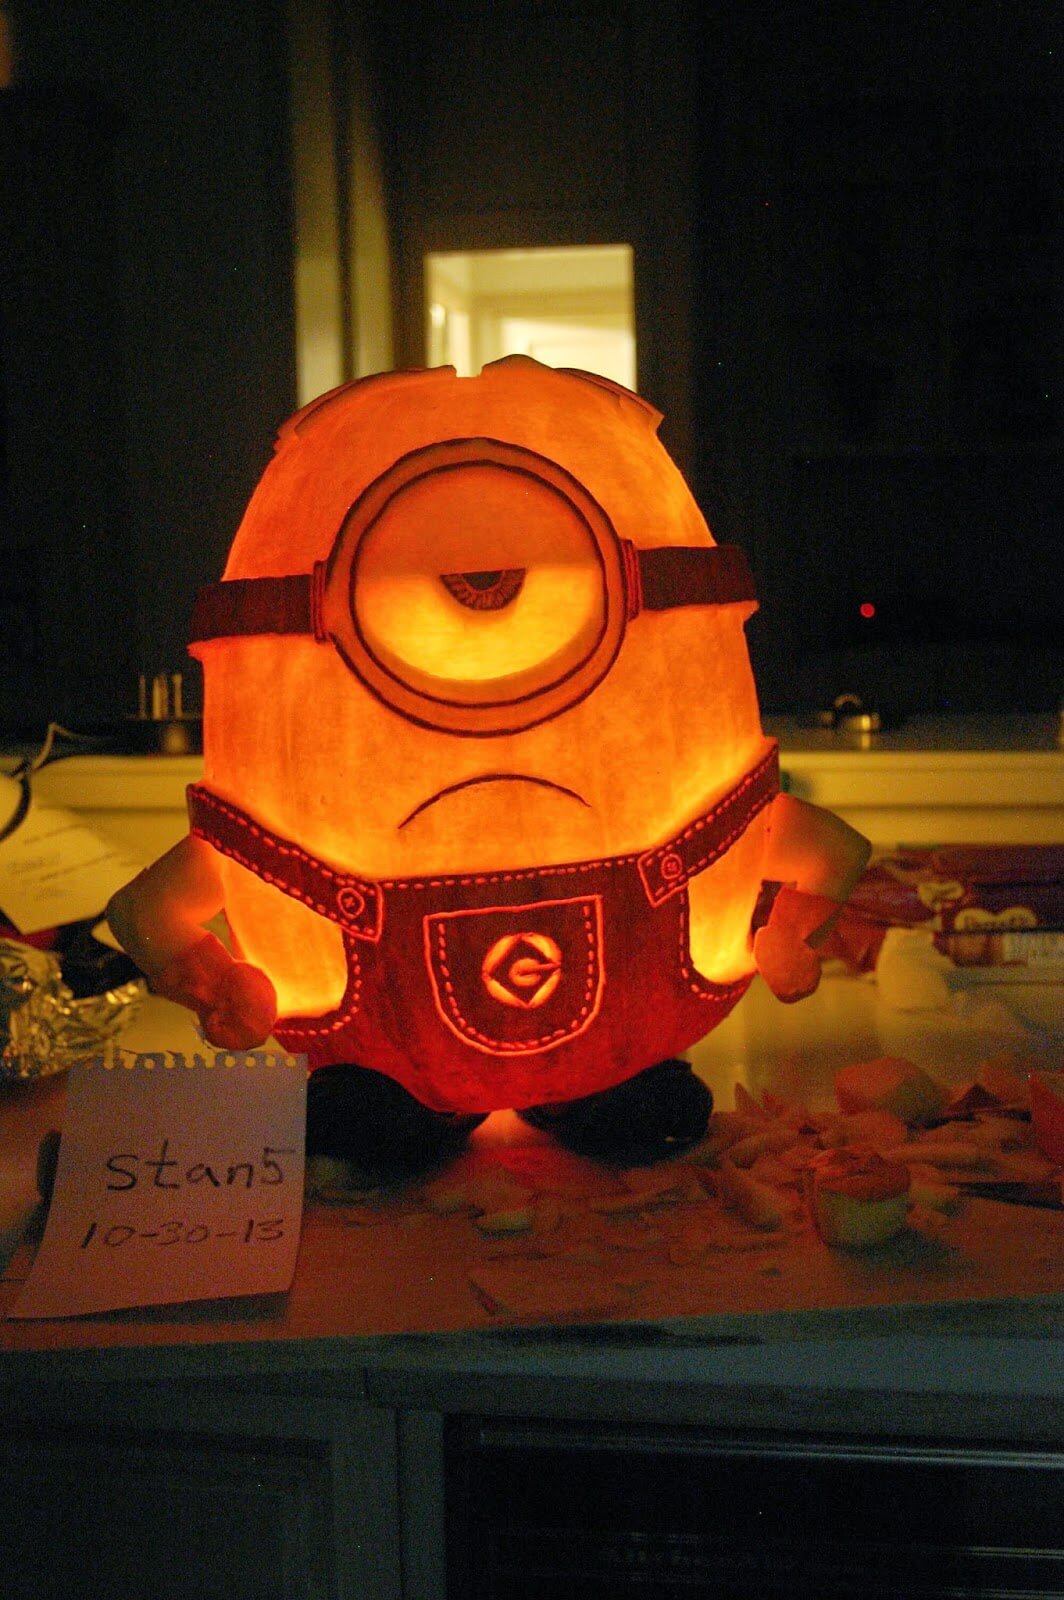
Who doesn’t love minions? This is definitely one of our cuter Halloween decoration ideas. If the overalls seem like an overwhelming task, you could always just carve the iconic minion face. The fun thing about this design is that you can do it in a few different ways by making the minion happy, sad, or even scared. You’ll also want to carve the top of the pumpkin to have a more minion shape.
12. The Cookie Cutter Trick
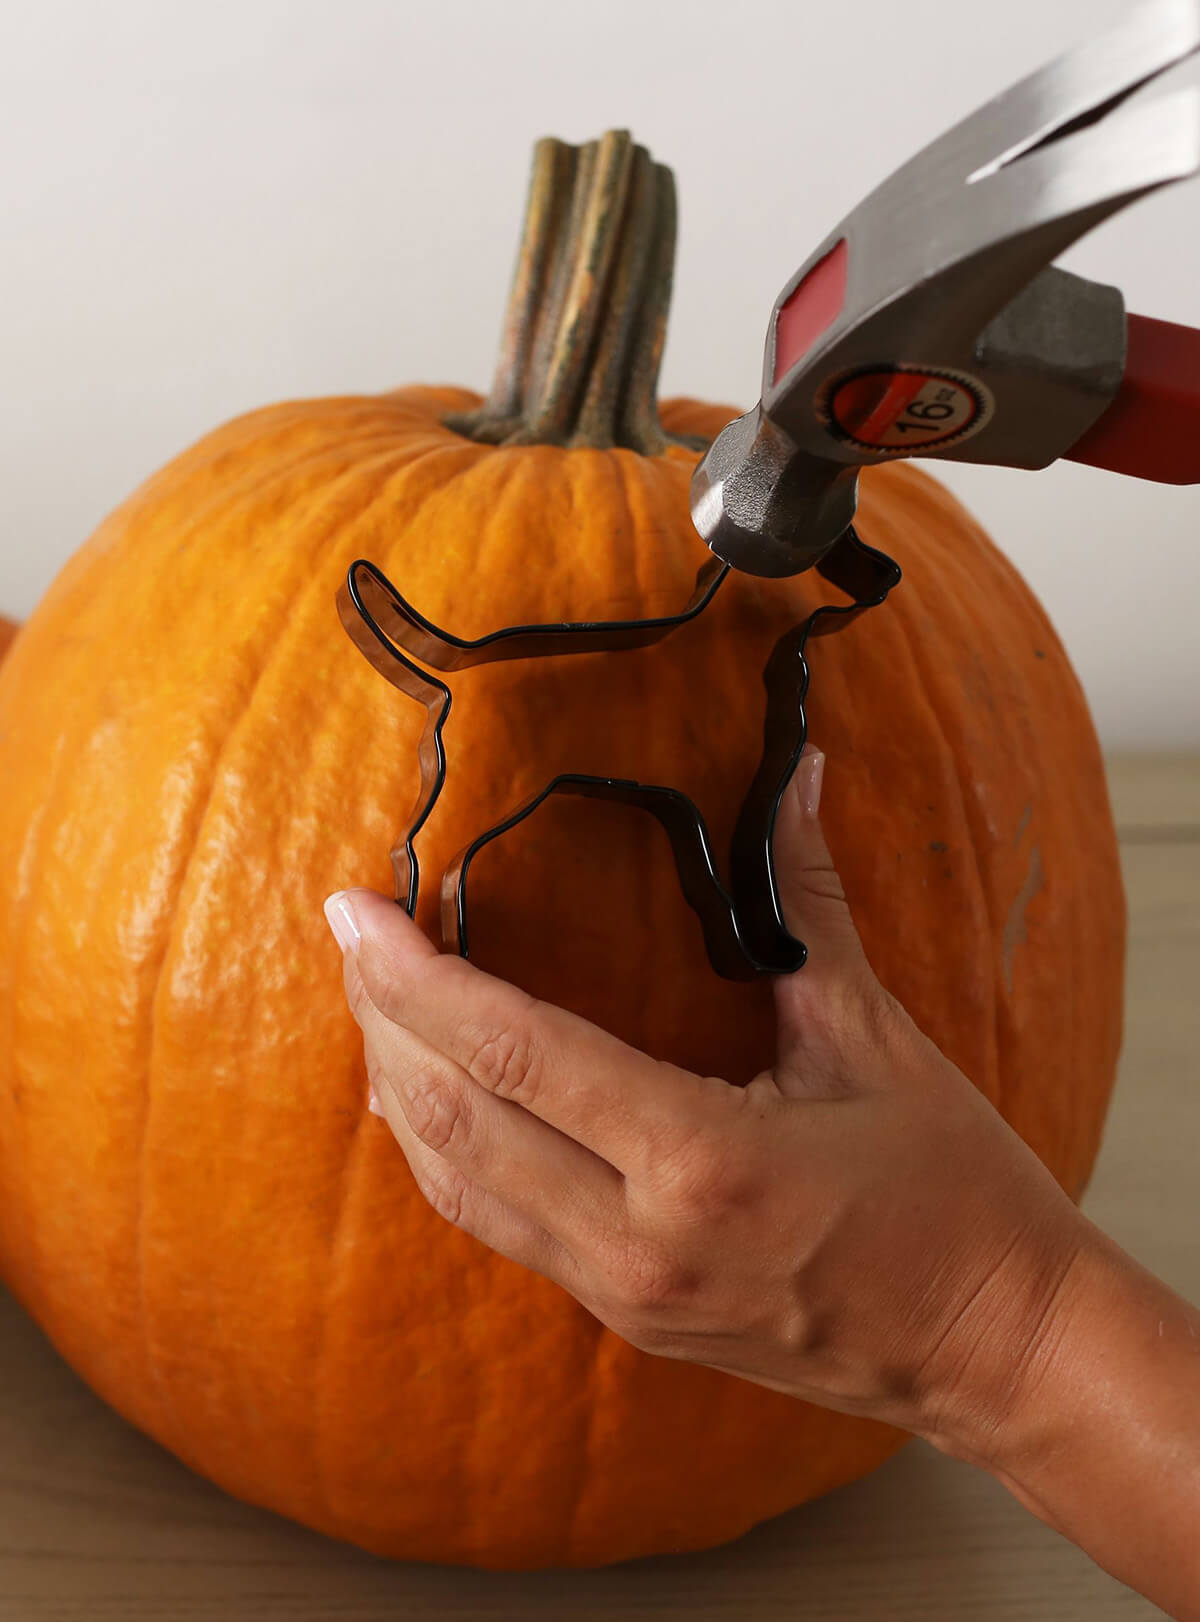
This trick makes DIY Halloween decorations easier than ever. All you do is a cookie cutter and a mallet. Place the cutter where you want it on the pumpkin and hammer it in with the mallet. The easiest way is to hammer it all the way through. However, you can always hammer lightly enough to create an indent and then carve from there. There are so many Halloween cookie cutters to choose from if you go with this trick!
13. Night Sky
This is a very simple design if you are just getting the hang of carving. You can use stencils in the shape of stars and the moon or you can even use the cookie-cutter trick. You can choose to carve all the way through and add a tea light to get that typical illuminating Jack-O-Lantern look or you can just carve through the top layer of skin.
14. Witchy Woman
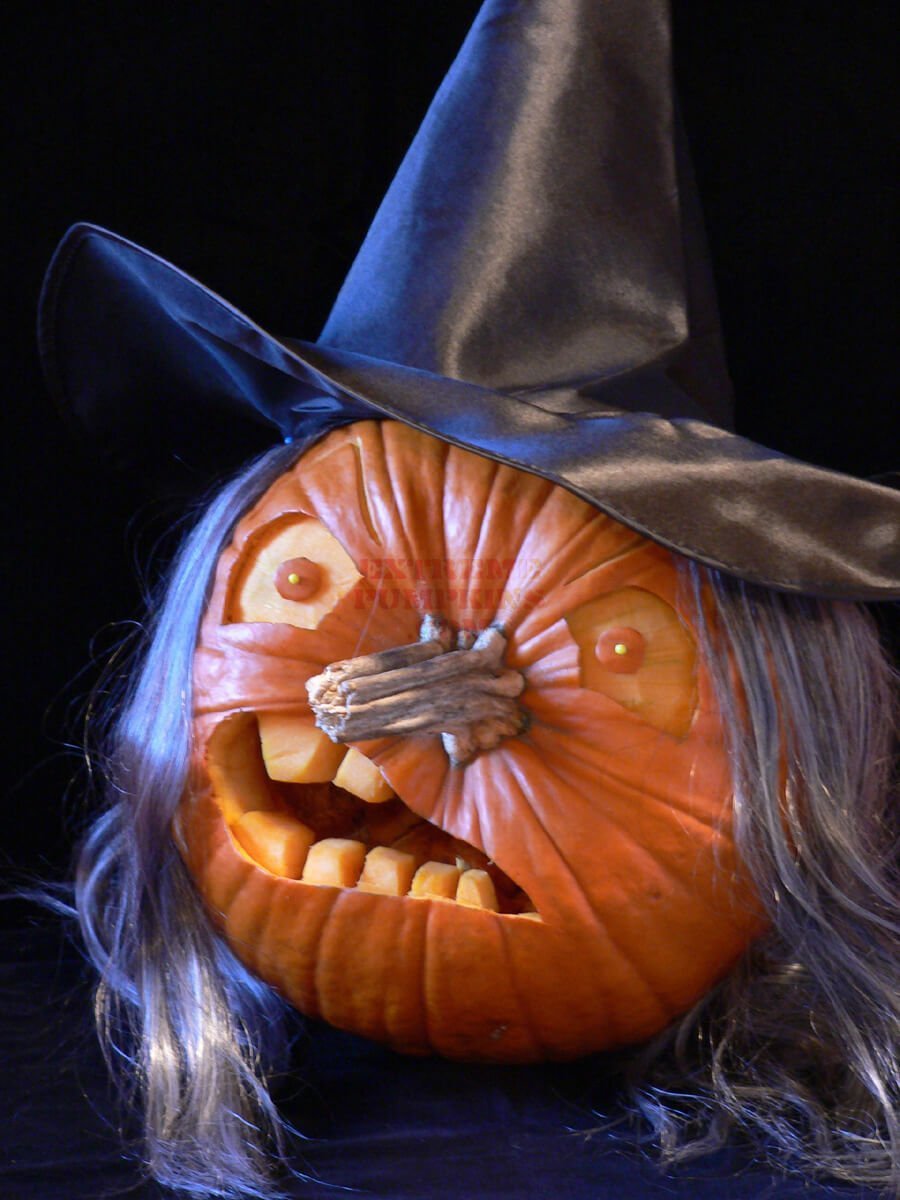
This is one of the most fun and unique Halloween ideas on our list! You’re going to want to use the top of the pumpkin as the face so the stem functions as a long witch’s nose. You can get creative with the nose and the eyes, but the scary design is best for a Halloween theme. Add a long wig and a classic black witch’s hat to complete the look!
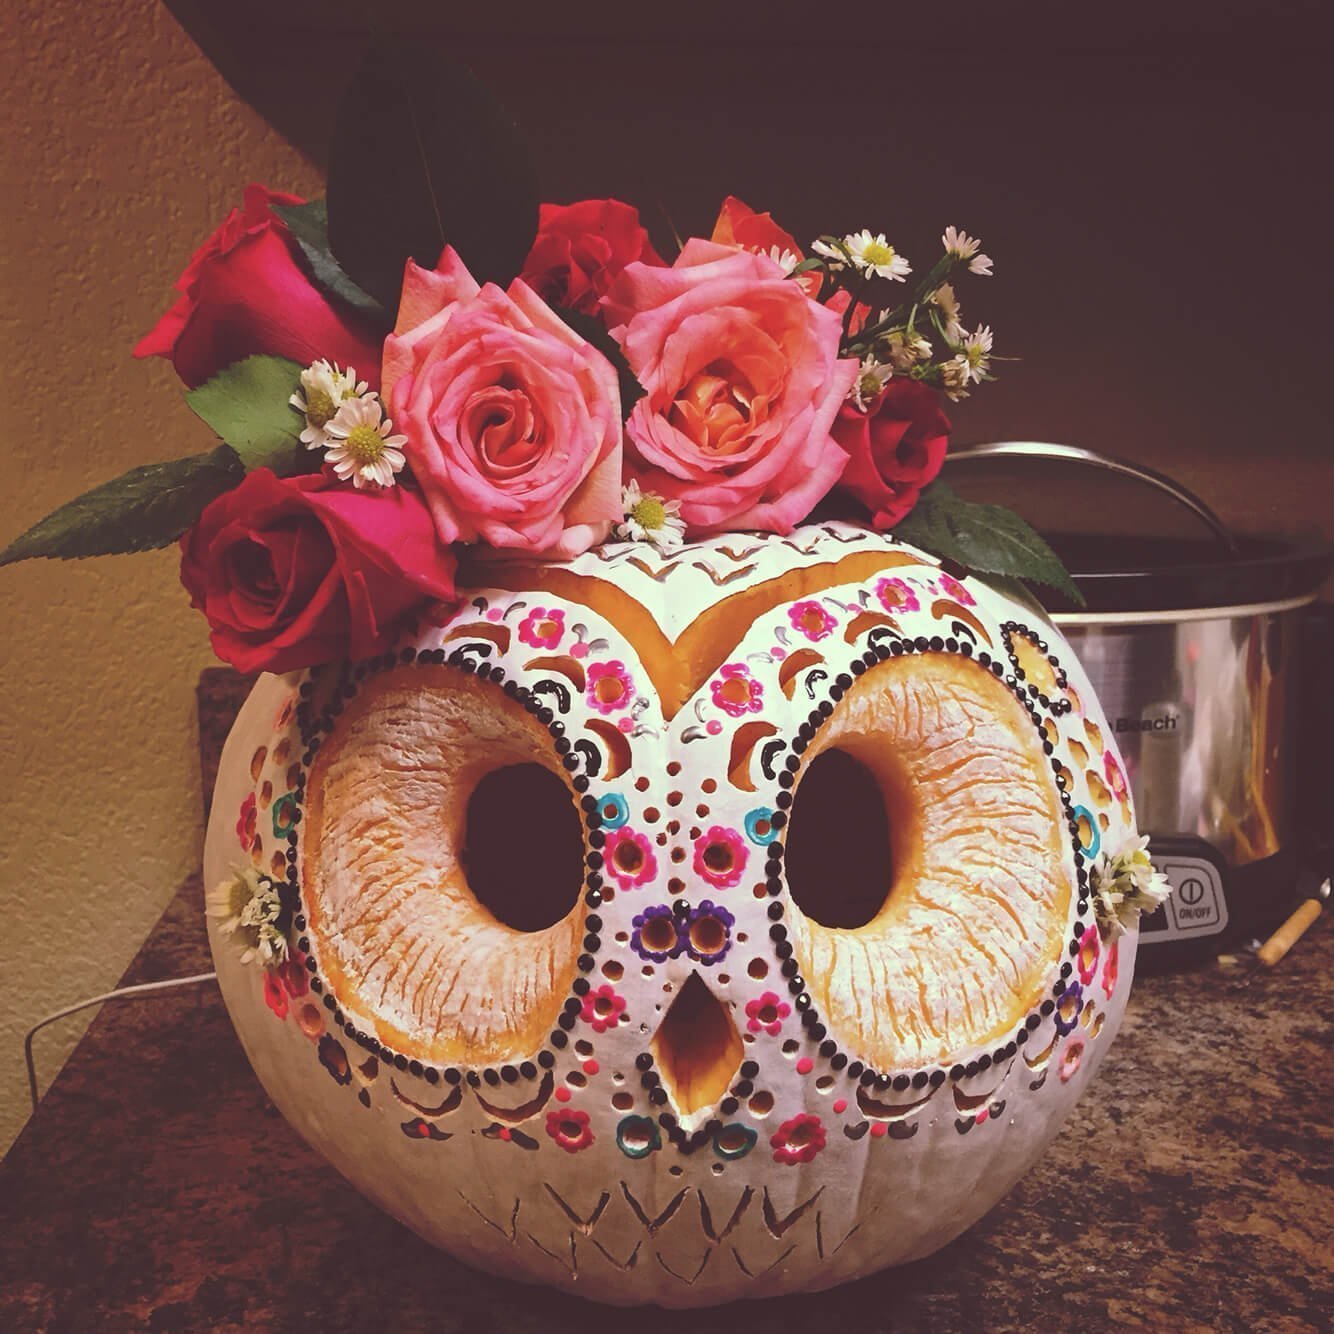
15. Sugar Skull
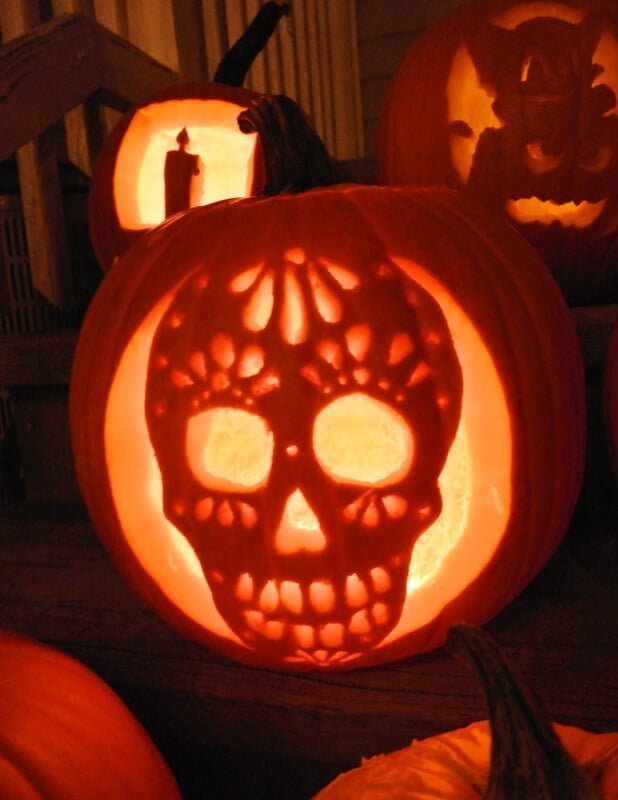
This pumpkin design fits perfectly with a traditional Halloween theme. There are several templates you can use to make this look. You could also draw your own skull idea on the pumpkin and carve it. It would take a little bit of creativity, but would not be nearly as difficult as it looks.
16. Candy Corn Craze
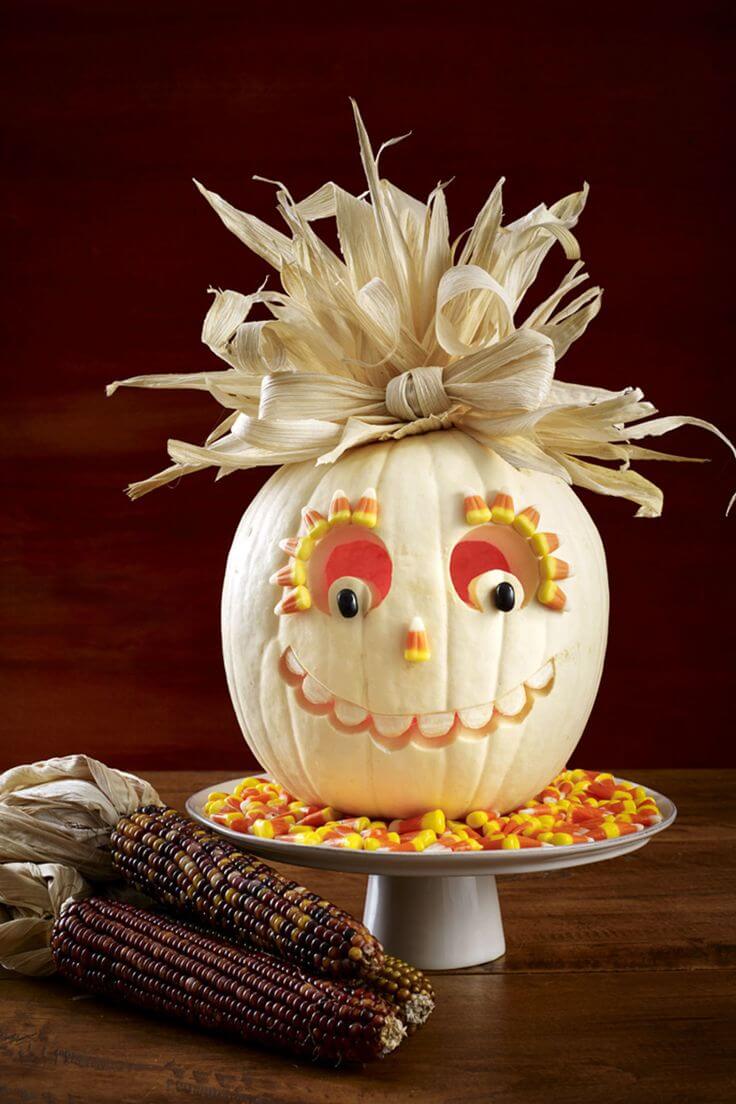
This is such a fun idea if you love candy corn. It’s also a great idea if you hate candy corn because you don’t have to eat it if it’s on your pumpkin! You can create this look by carving a simple face, painting the pumpkin white, adding some funky ribbon hair, and gluing on the candy corn eyelashes. Candy corn can also be used on your pumpkin in a variety of ways if you had a different idea in mind.
17. Zombie
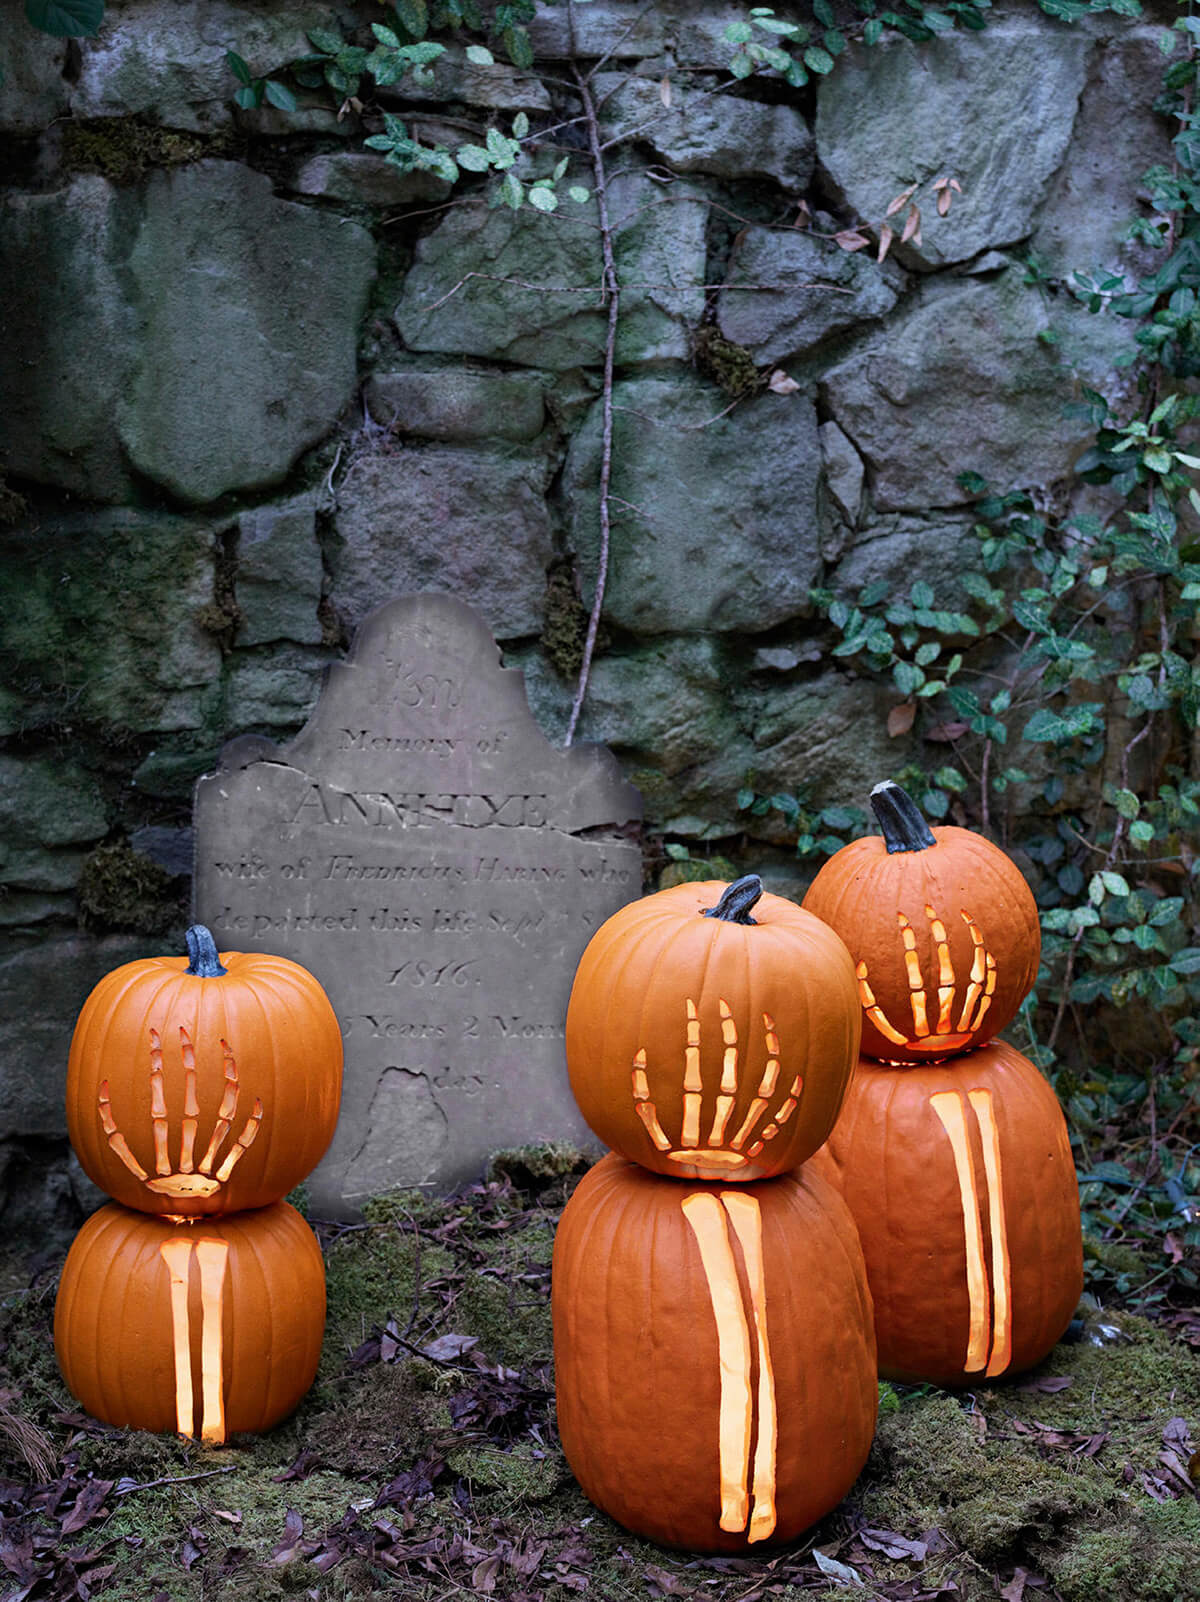
Are you looking for cool pumpkin carvings that will make your lawn look like a spooky graveyard? These double-decker pumpkins are a great option for scary pumpkin carving patterns. You’ll need two pumpkins; one will be slightly smaller than the other. On the larger bottom pumpkin, you’ll have the skeleton arm, which consists mostly of several vertical lines. The top pumpkin is a bit more complicated with the skeleton hand.
18. Googly-Eyed Monsters
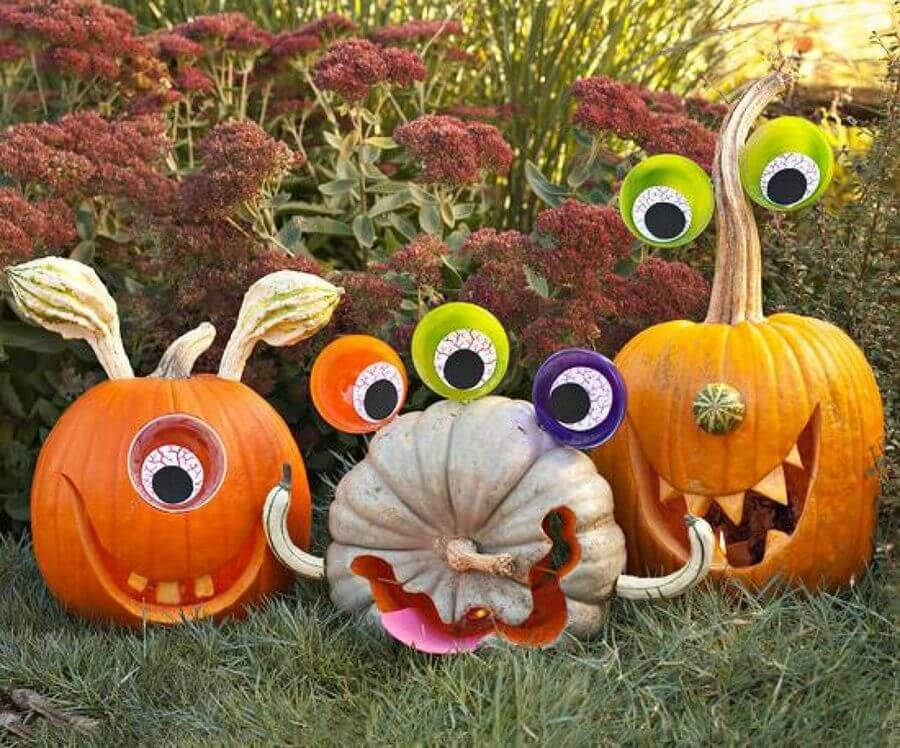
You can choose cute or scary faces when creating these monster-inspired homemade Halloween decorations. You might want to get some additional tools, such as googly eyes, cotton balls, and paint, for this project. For the most part, you only need to carve the mouth and you can get creative with that. You can also carve a circle to place the eyes or you can add them right on top.
19. Ding! Dong! The Witch is Dead
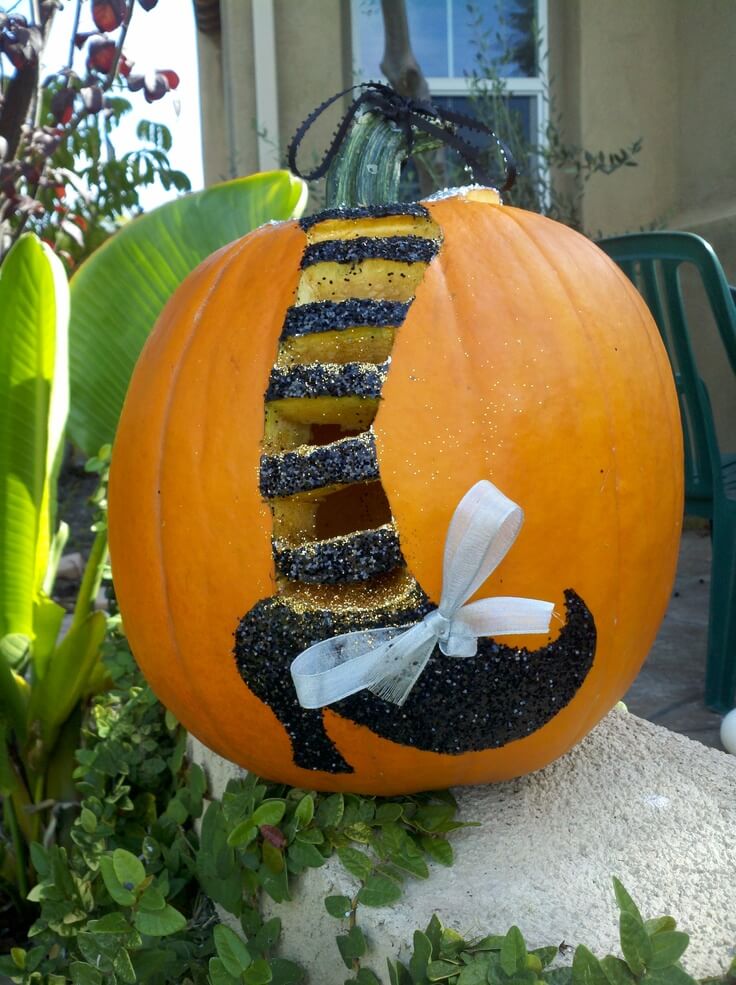
This is one of those simple Halloween decoration ideas that is effortlessly clever and cute. You can alternate between carving and painting for the stocking or you can just choose two different paint colors to save yourself some carving time. Paint on the black shoe and add a ribbon to complete the look.
20. Hoo Wants Another Owl Pattern

Owl templates can be more versatile than you might think! With a smaller pumpkin, you can just carve the face rather than try to squeeze the whole body on there. The face alone can turn out much cuter on a smaller size. If are set on the feathers and wings, there are a few different looks you can try.
21. Spiral Top

This simple design looks great from an aerial view. With this one, you can leave the front of the pumpkin intact if you want. However, you can choose to add some geometric patterns on the front to enhance the look. Instead of carving off the entire top, you’ll just carve in a spiral design.
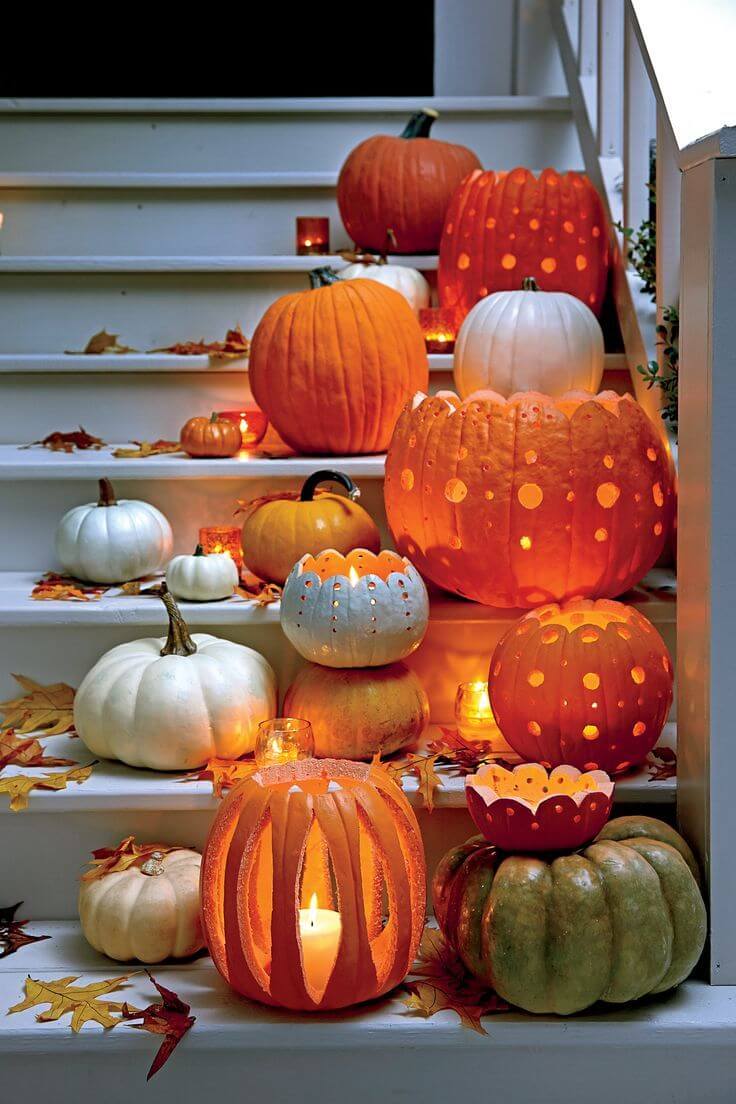
22. Small Porch Style
Styling a small space can be difficult, but these pumpkins are sure to spruce up your porch in a simple and easy way. The best way to do it is to get several pumpkins of all different shapes and sizes to create a funky, eclectic look. You can add faces to the pumpkins or different patterns. This is your chance to get really creative to change the whole appearance of your porch.
23. Plant It On Me
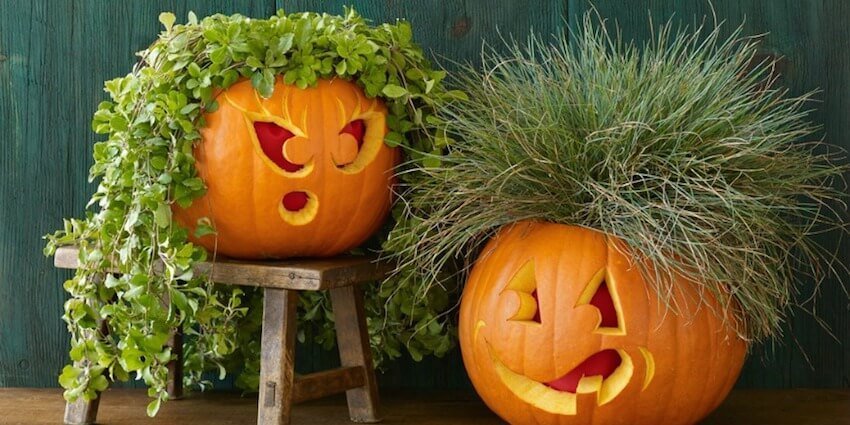
Have your pumpkins serve two purposes! Carve them out completely and put some potted plants in there. Not only is doubling up a good way to save space on your front porch but your fall plants will serve as crazy hair for your Jack-O-Lanterns. You’ll need to carve a face into the front to complete the look but you can make them silly or scary.
24. More Drilling Ideas
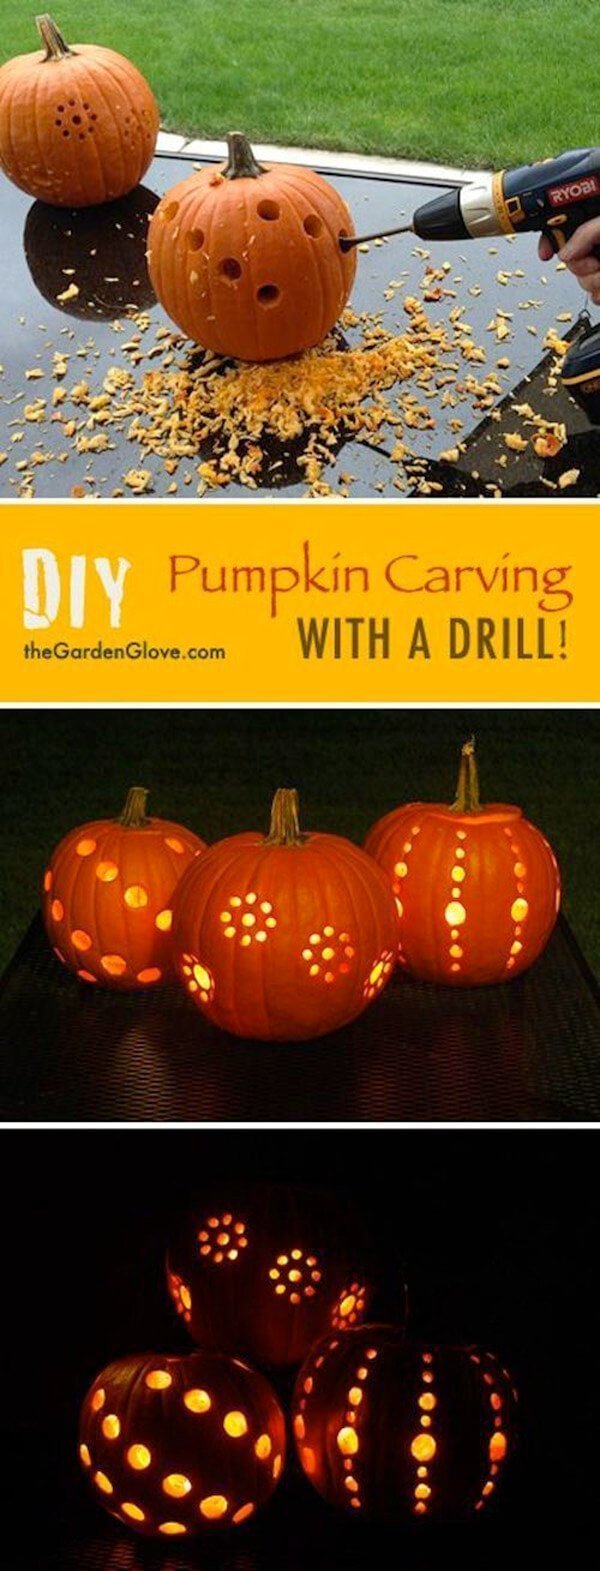
Here are a few more pumpkin drilling ideas so we can take a break from all the carving. Drilled pumpkins make great DIY Halloween decorations. Pre-marking your pumpkin is a helpful trick to ensure your design comes out how you envisioned it. One thing to keep in mind is that this will make a mess! It might be a good idea to do it outside.
25. Haunted House
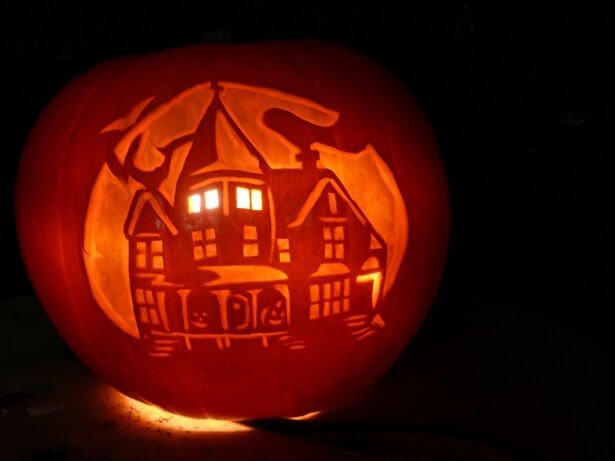
This is an intricate design that can look truly beautiful in front of your house. The trick to getting the one spooky, glowing window is to not carve all the way through the pumpkin when making the rest of the house. Pick the windows you want to illuminate and carve those all the way through so the candle shines brighter.
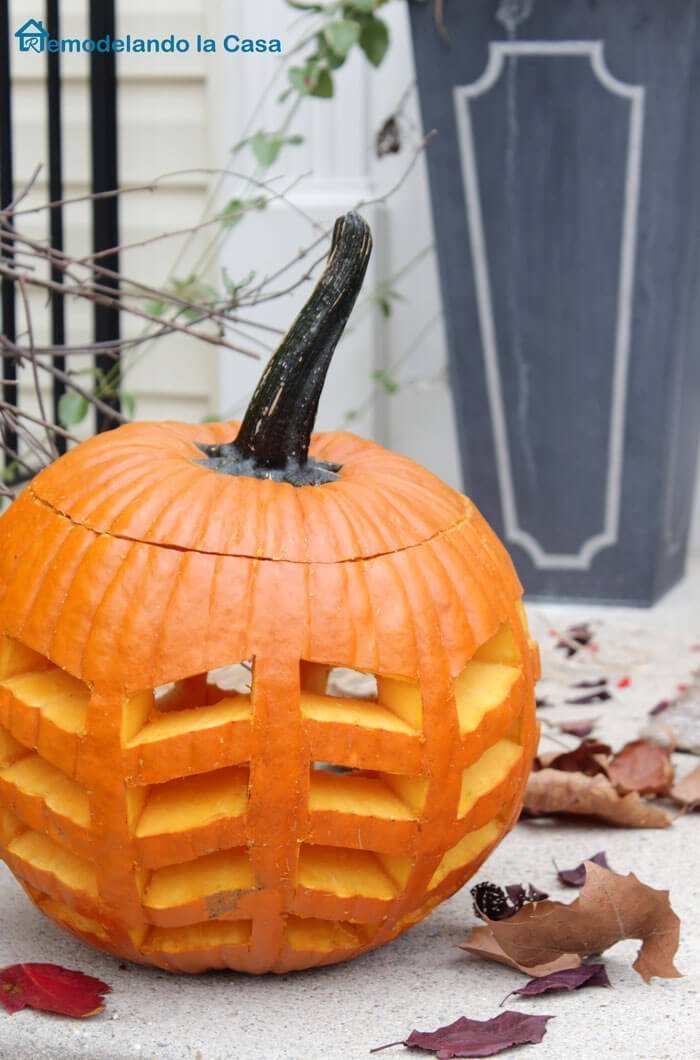
26. Lace Patterned Pumpkins

If you want to try something different this year or orange really isn’t your color, these lace patterned pumpkins are perfect for you. You can even use squash instead of a pumpkin for these cool Halloween decorations. Use masking tape as a guideline and carve a pattern repeatedly around the pumpkin above the tape.
27. Stargazing
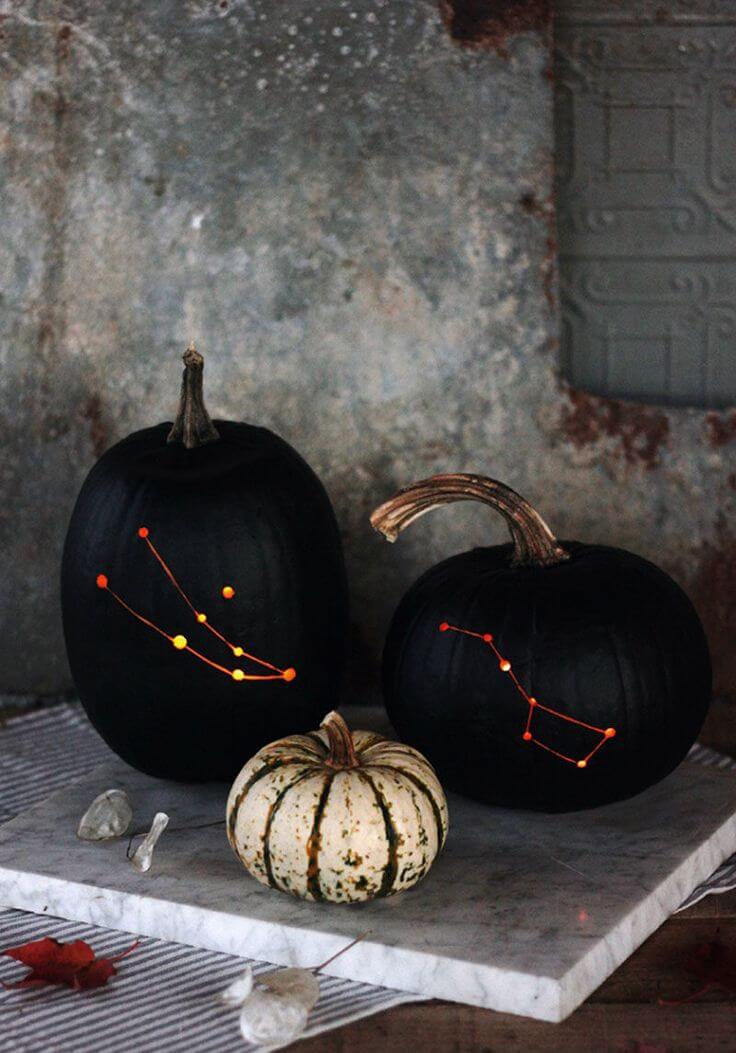
These constellation pumpkins are the perfect complement to a starry, fall night. You’ll just have to pick your favorite constellations to get started. First, spray paint the pumpkin black so the constellations will stand out against it. You could also spray paint a blue or navy color to resemble a brighter sky. It is easiest to use a drill to create the constellation and use a v-chisel to connect the dots.
28. Engraved Pumpkin
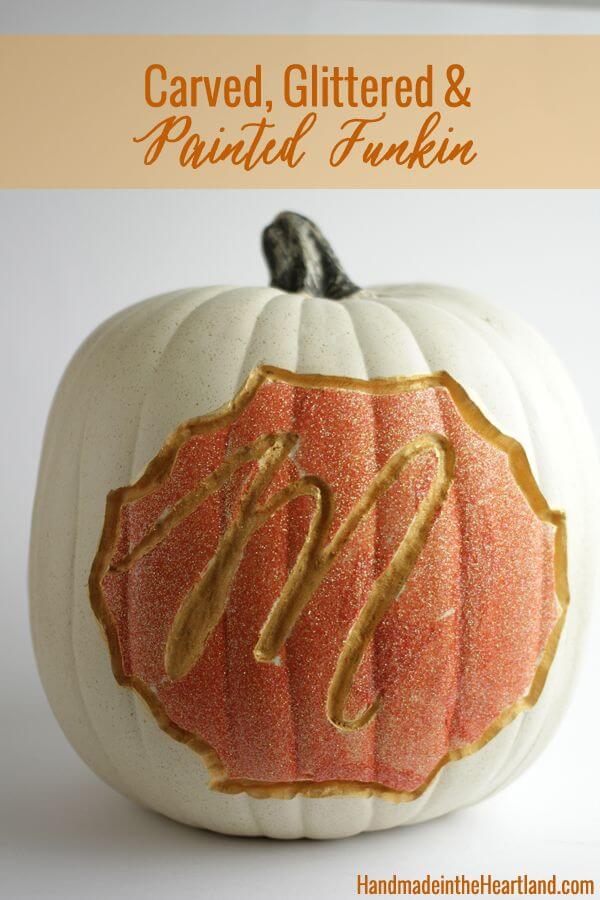
This is one of our more unique Halloween decoration ideas and requires some extra tools to accomplish. You’ll need a tool that comes with an engraving attachment and a grinding stone. You’ll also need glitter! Paint the pumpkin whichever color you choose, although the white creates a nice balance. After you paint, you’ll carve the border and engrave your initial. Finally, you’ll put the glitter within the border.
29. Writing On The Pumpkin
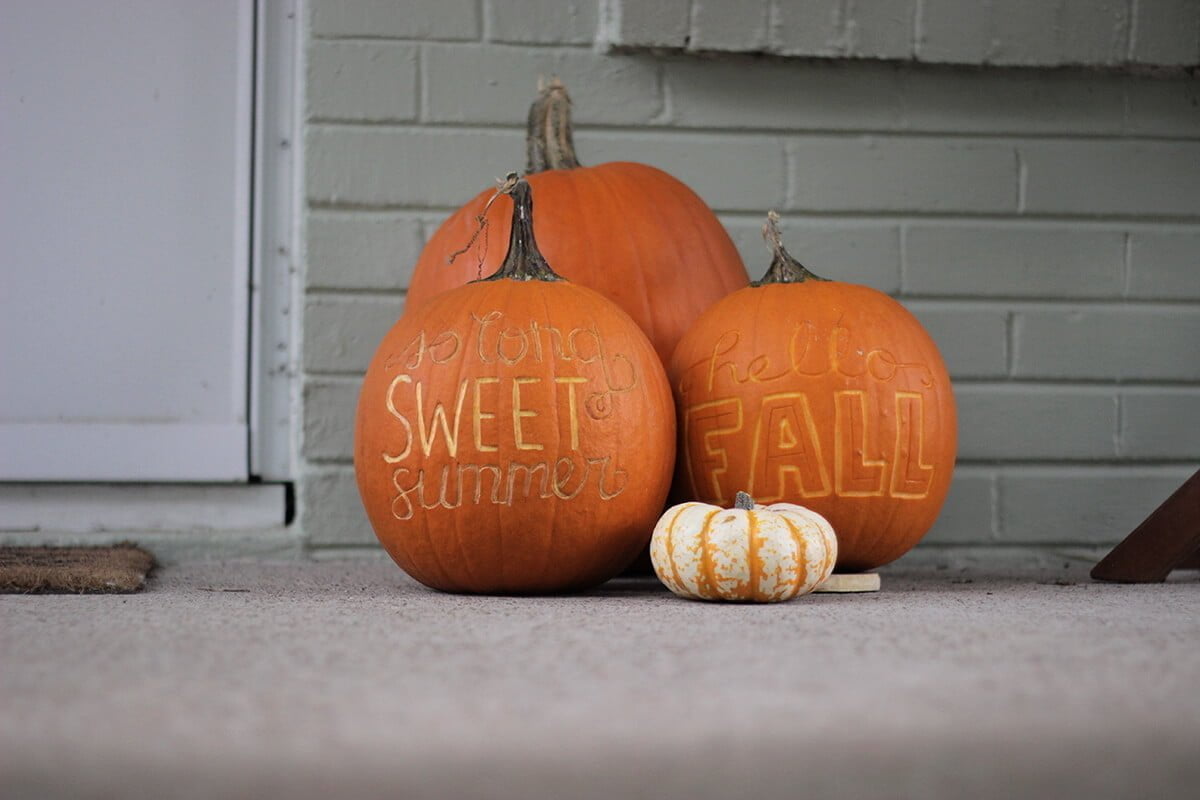
This is one of those easy pumpkin carving ideas that can save your arm a lot of work. You’ll want to write a fun, Fall phrase. You can use a stencil to write the names on the pumpkin or you can try it freehand. You do not have to carve all the way through the pumpkin. It looks better if you just carve it lightly so there is a contrast in color.
30. Rose Petals
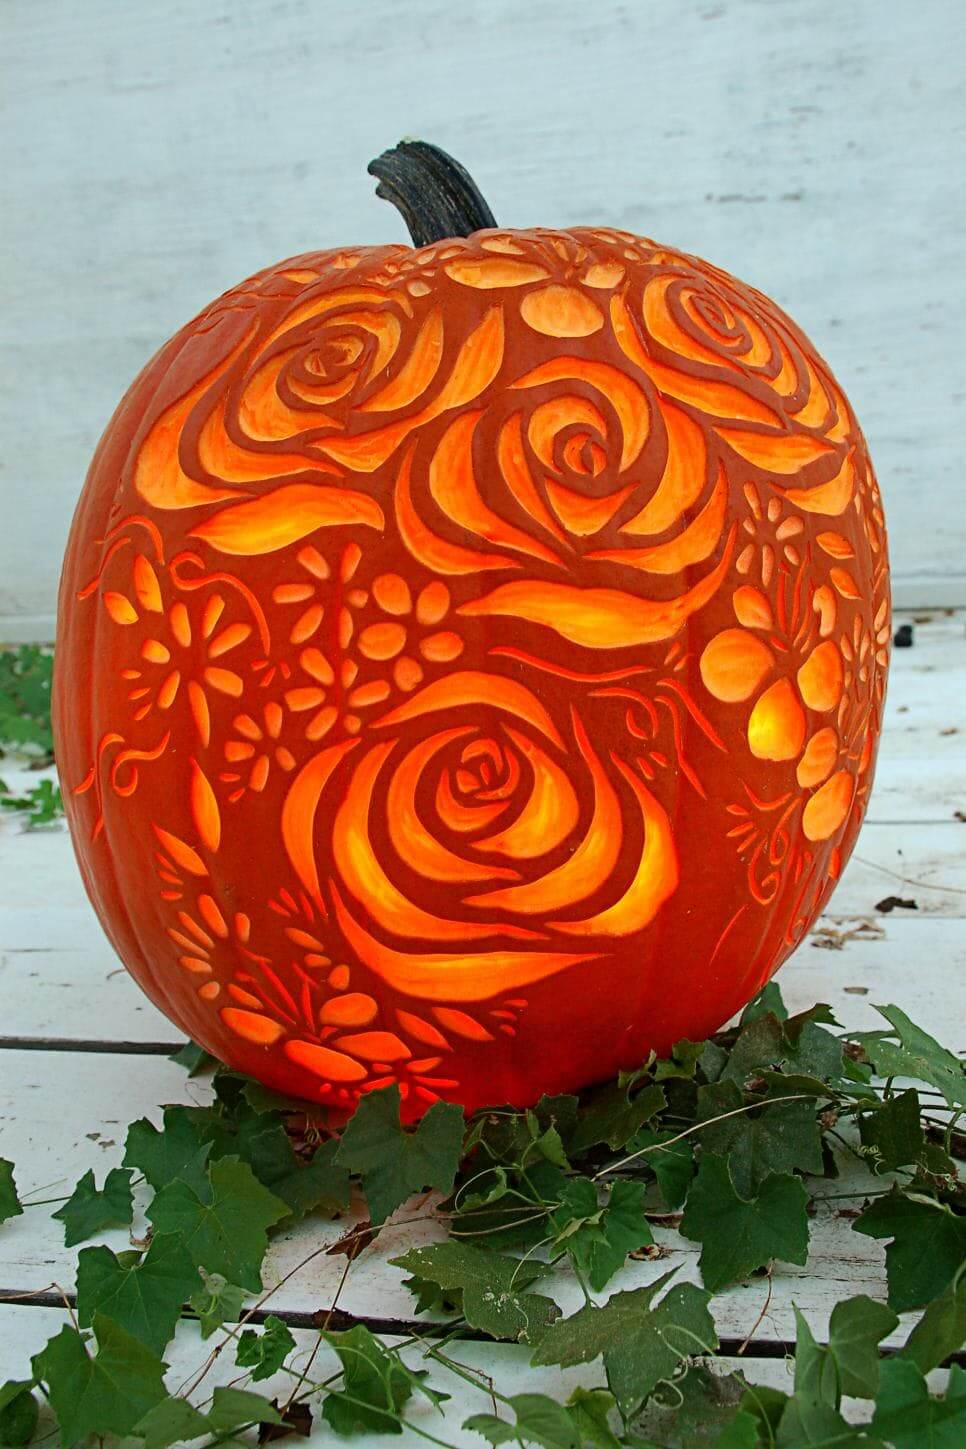
This is one of the most beautiful pumpkin carving patterns on our list. The trick is to carve deeper on some parts of the petals to create a textured look and a contrast in color. You’ll want to do a more shallow carving for the vines, petals, and outer flowers. The petals will be deeper with some sections even going all the way through the pumpkin so the flame shines brightly. The exact design and the layout of the flowers can be totally up to you.
31. Hot Knife Carving
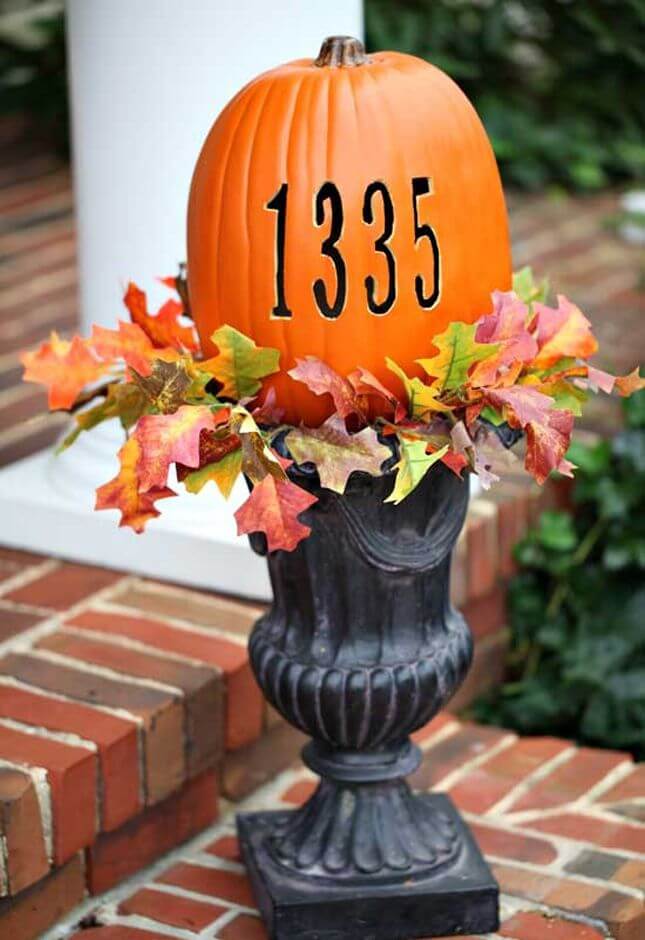
If you want truly unique Halloween decor, try a foam pumpkin and a hot knife, instead of a typical Jack-o-Lantern. Keep in mind you cannot place a candle inside of a foam pumpkin, but battery powered lights are always an option. You’ll need to stencil the number or letter onto your pumpkin beforehand. After that, all you have to do is use the hot knife to carve offer your stencil. It will come out as black letters or numbers against the orange foam pumpkin.
32. Classic Jack-O-Lantern
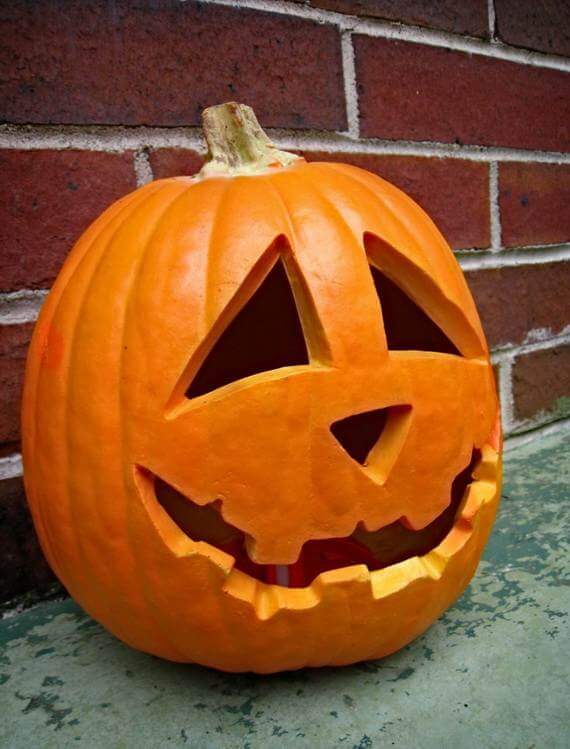
When you’re looking for pumpkin faces to carve, sometimes nothing beats the classic Jack-O-Lantern face. It’s easy to find a stencil with this well-known face. Just carve in the two triangles for eyes and the triangular nose. You can use some creativity for the mouth, but you’ll probably want some variation of the wide smile with teeth. Stick your candle in there and this spooky look is ready to go!
33. Feather Carved Pumpkin
This lovely design will look beautiful with flames illuminating through all the carvings. You’ll want to draw on the pattern before carving it in. You can download a template or try to do it yourself by drawing a pattern of rhombus-like shapes. Once you’ve drawn it on, you will carve it in. An electric carving tool will make this process a lot easier, but with a little patience and dedication, you can carve it manually.
34. Fall Floral Prints
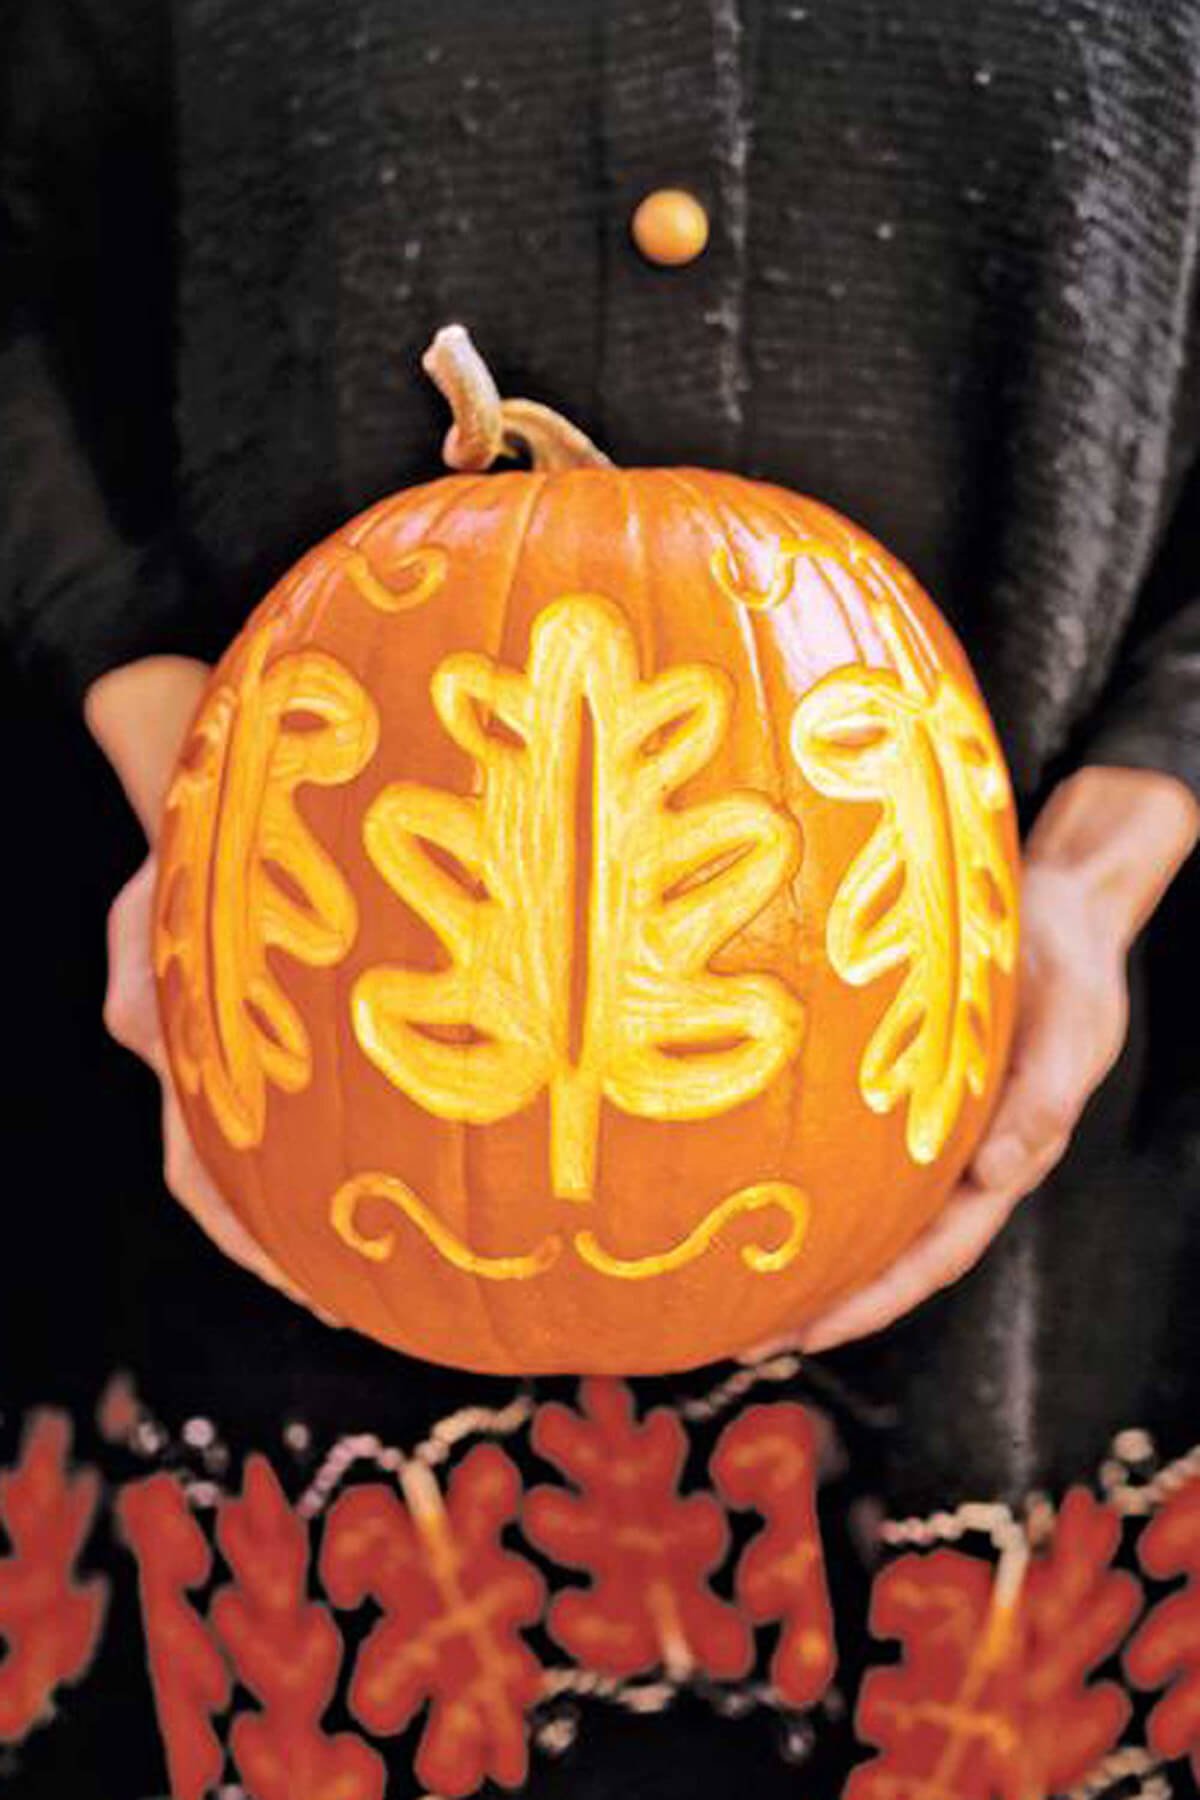
Some cool pumpkin carvings are perfect for any time during the Fall season. This is a simple pattern that highlights the beauty of Fall leaves. This pattern has the leaves alternate which side they’re facing. You could also do two different types of leaves or a variety of different facing leaves. A border around the leaves will add a tasteful accent.
35. Get Your Drill On

We can’t get enough of drilling pumpkins! It’s so quick and easy, and you can create so many amazing designs. This one turns your pumpkin into a disco ball! All you have to do is drill holes wherever you see fit. You can drill a consistent pattern or you can randomly put them in all over. It is up to you! When you put the candle inside, the flame will shine brightly through the holes and light up the night.
36. Kitty Cat
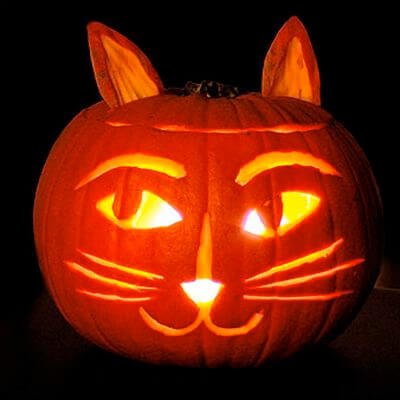
This is another one of our animal pumpkin carving faces. It would look adorable on your front porch. You’ll be able to master the face without a problem, just remember to add the whiskers. The ears can be trickier. There are a few different ways you can get the ears to sit on top of the pumpkin. One way is to carve them out of another pumpkin and stick them on with toothpicks. You could also carve them into the pumpkin if you made a smaller cat face.
37. Starry Night
When you’re doing this activity with your children, you want pumpkin carving templates that are simple, but cute. Carving stars is a great place to start. The template is easy to follow and you can be creative with it. You can carve one giant star or you can do stars of various sizes in a repetitive pattern. This is also a great choice if you have a smaller pumpkin or different size pumpkins because it works on all of them.
38. Spooky Spiders
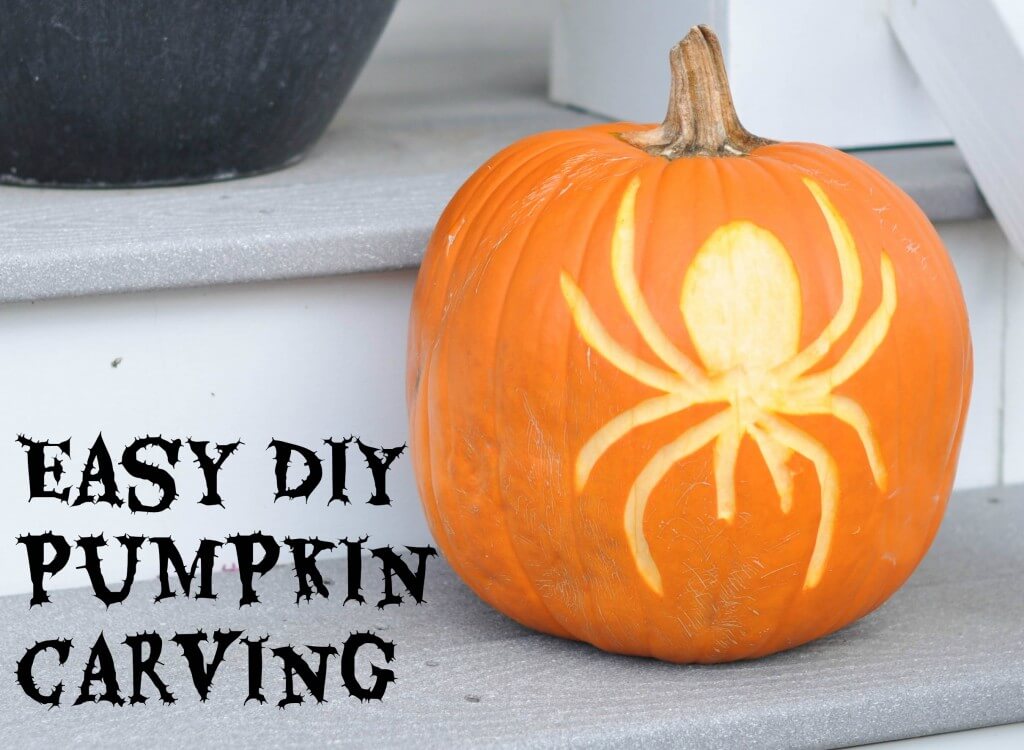
Check out our spooky spider carving if you’re looking for easy pumpkin carving ideas that fit with the Halloween theme. You’ll need a large pumpkin to fit this whole spider and then you’ll go ahead and cut off the top with your serrated knife. You won’t be carving it too deep so you can use a basic carving tool set.
39. Monster Mash
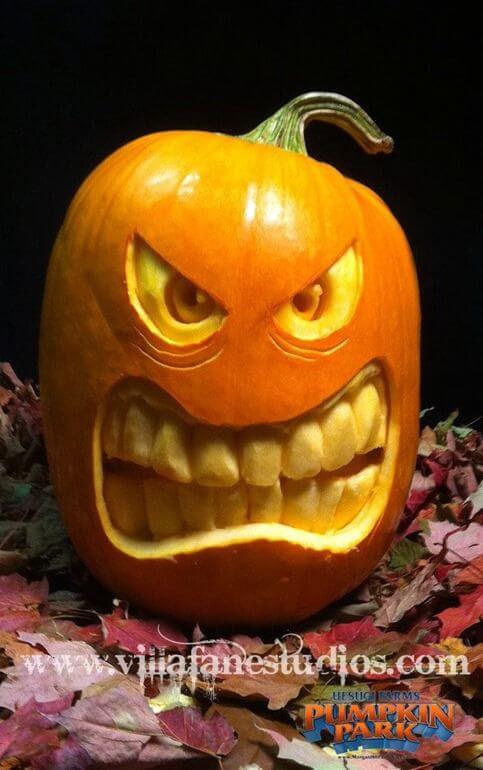
Get in the Halloween spirit by carving this terrifying monster face. The intricate eyes and teeth make this design a bit more difficult than some of our other pumpkin carving patterns. You’ll want to start by carving the shape of the eyes and mouth. To create the angry look in the eyes, carve the pupils and iris deeper than the eye’s outline. You’ll also want to add subtle lines under the eye to look like wrinkles.
40. Painted Owl
The carving part on this cute pumpkin is pretty easy. You just have to carve two giant ovals for the eyes, but don’t carve all the way through the pumpkin except for two circles in the middle for the pupils. You’ll also want to carve a small upside down triangle under the eyes for the beak. Paint a floral pattern around the eyes in a design that you love. To finish it off, stick some flowers through the top of the pumpkin.
41. Cute And Cuddly Faces
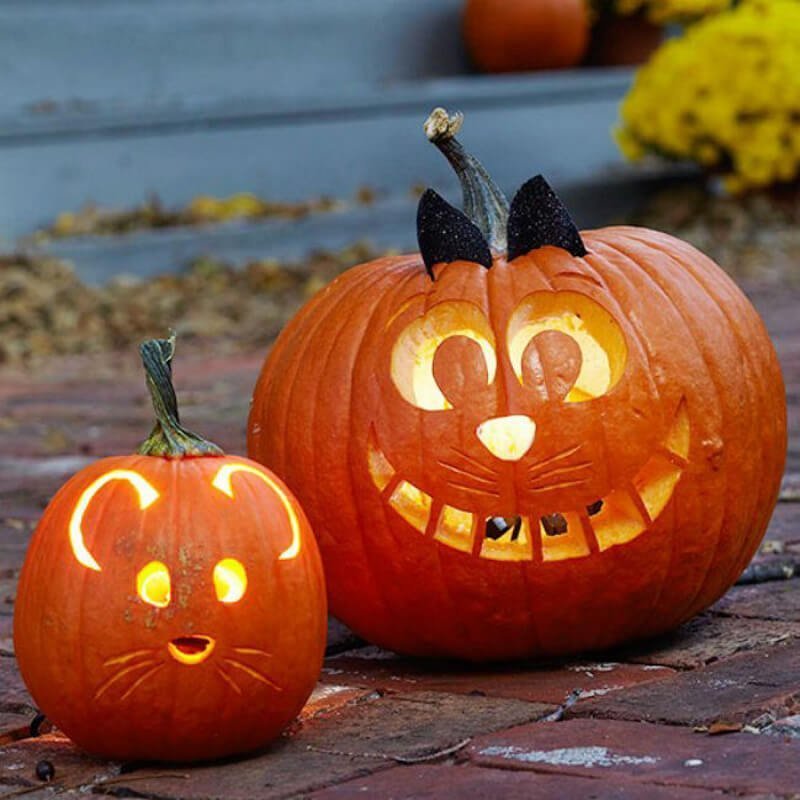
Sometimes, monster pumpkin carving faces are too scary even for Halloween. Simple cartoon or animal faces can be the best way to go, especially with kids. A mouse takes no time at all and you don’t even need a template. Just don’t forget the whiskers! Cartoon characters are also a fun idea, like this example of a Cheshire cat carving.
42. Skyline
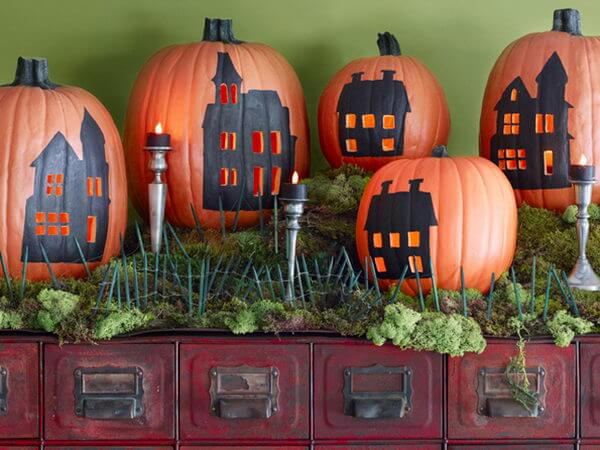
One way to utilize multiple pumpkins is to create a skyline, a neighborhood of haunted houses, or even a landscape. You can choose a variety of pumpkins in different sizes and line them up on your porch. If you really want this design to stand out, only carve out the windows in your houses and buildings. When you put your candle in, the windows will light up and look amazing against the black paint on the pumpkin.
43. Emojis
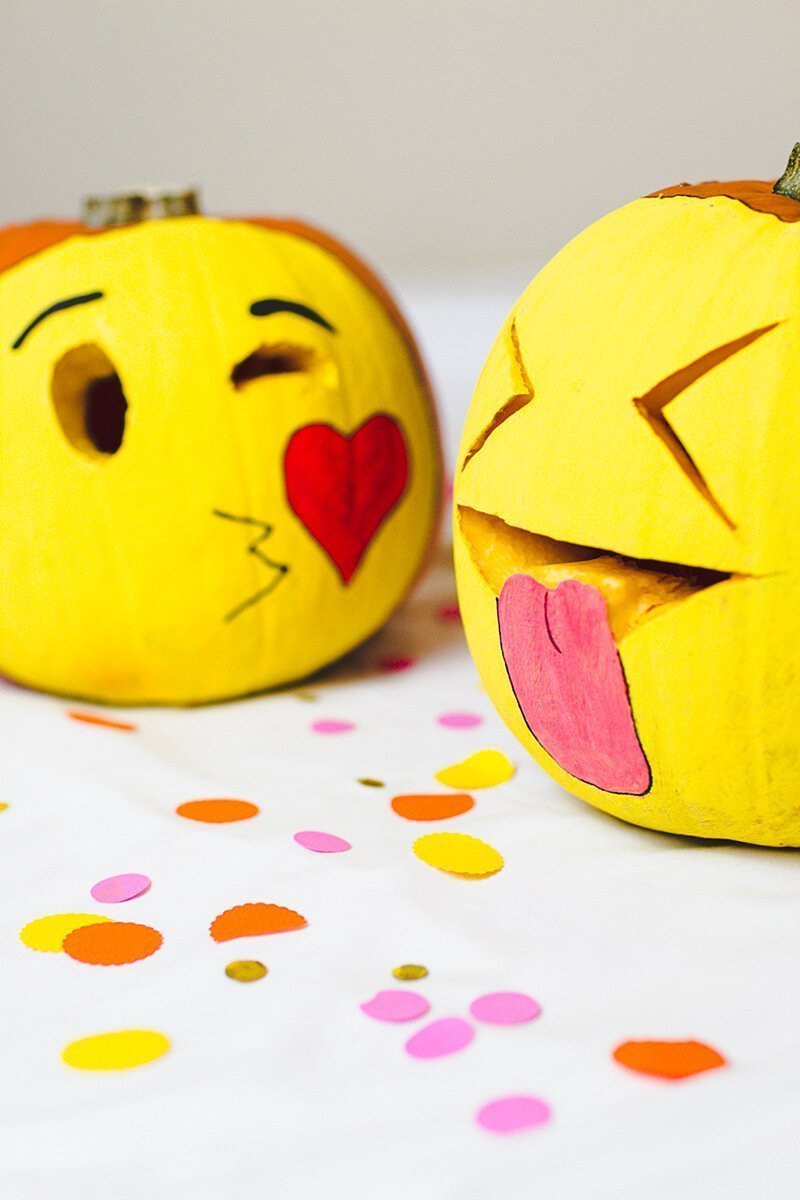
These emoji pumpkins are a great idea if you just want to paint your pumpkin or want to do a limited amount of carving. You might be surprised how easy it is to create an emoji pumpkin. Start by painting it yellow. Next, you’ll want to carve the eyes and draw on the mouth and other notable features of your favorite emoji.
44. Vine Branch
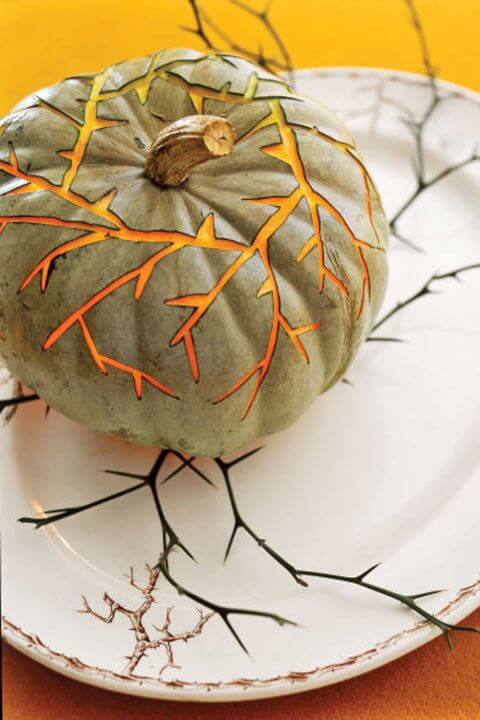
If you’re looking for Halloween ideas that work for the rest of the fall season, this elegant pattern is perfect for you. You’ll want to start by painting the pumpkin a neutral, fall color. It is not necessary to cut the top off of the pumpkin for this one if you do not want to. Carve a ring around the pumpkin stem and have the thorny vines extend from there. To complete the look, surround the pumpkin with actual vines that look like they’re coming out of the pumpkin.
45. Ghosts And Ghouls
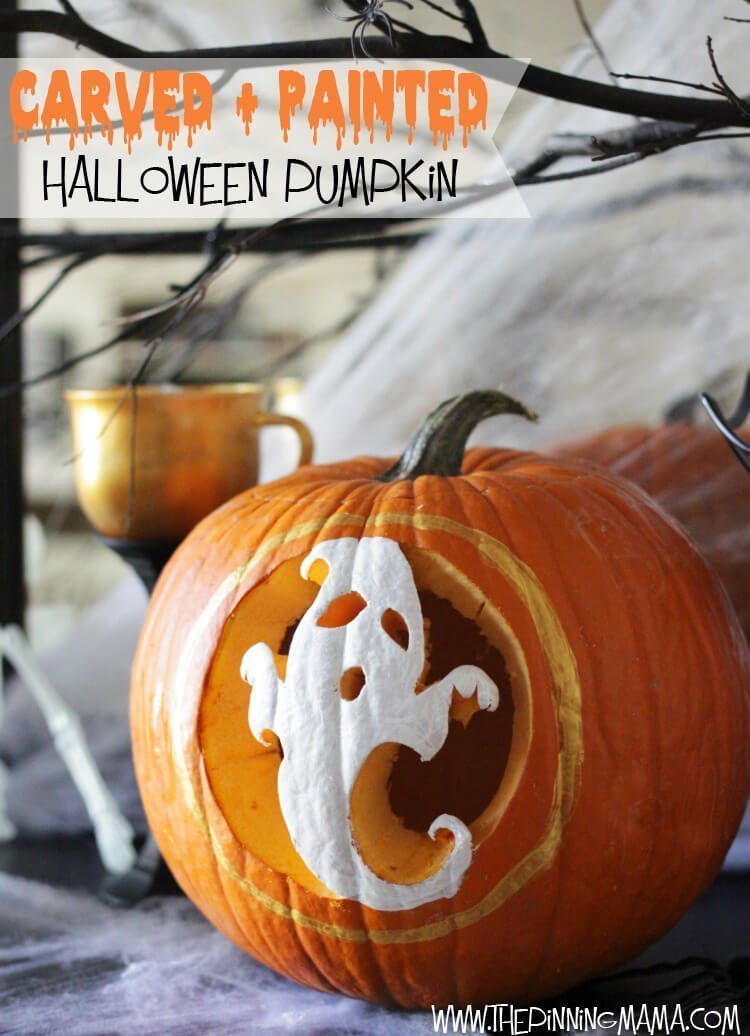
For this cute Casper-inspired pumpkin, carve around the ghost so it is illuminated by the light from the candle inside it. You can use a stencil to draw the ghost on and paint it or you can paint it freehand. Carve in tiny circles for the eyes and the mouth. You can use any size pumpkin for this boo-tiful design!
46. Bouquet Brain
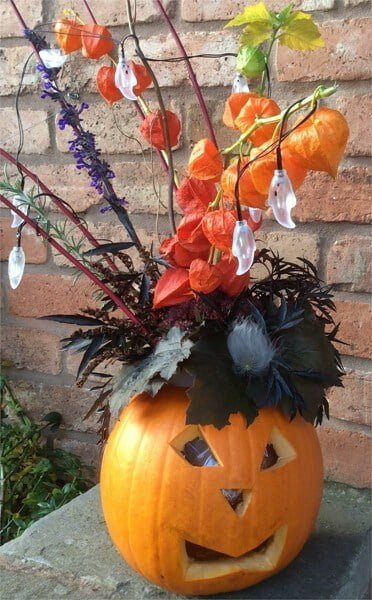
Make your floral arrangements truly unique by placing them right in your pumpkin! You can carve a face or any design into the front of the pumpkin. If you want to use your pumpkin as a vase during the entire Fall season, you’ll need to preserve it. One way is to cover it in peppermint soap which can slow the speed at which it decomposes. Soaking and refrigerating the pumpkin overnight can extend its life as well.
47. Happy Halloween
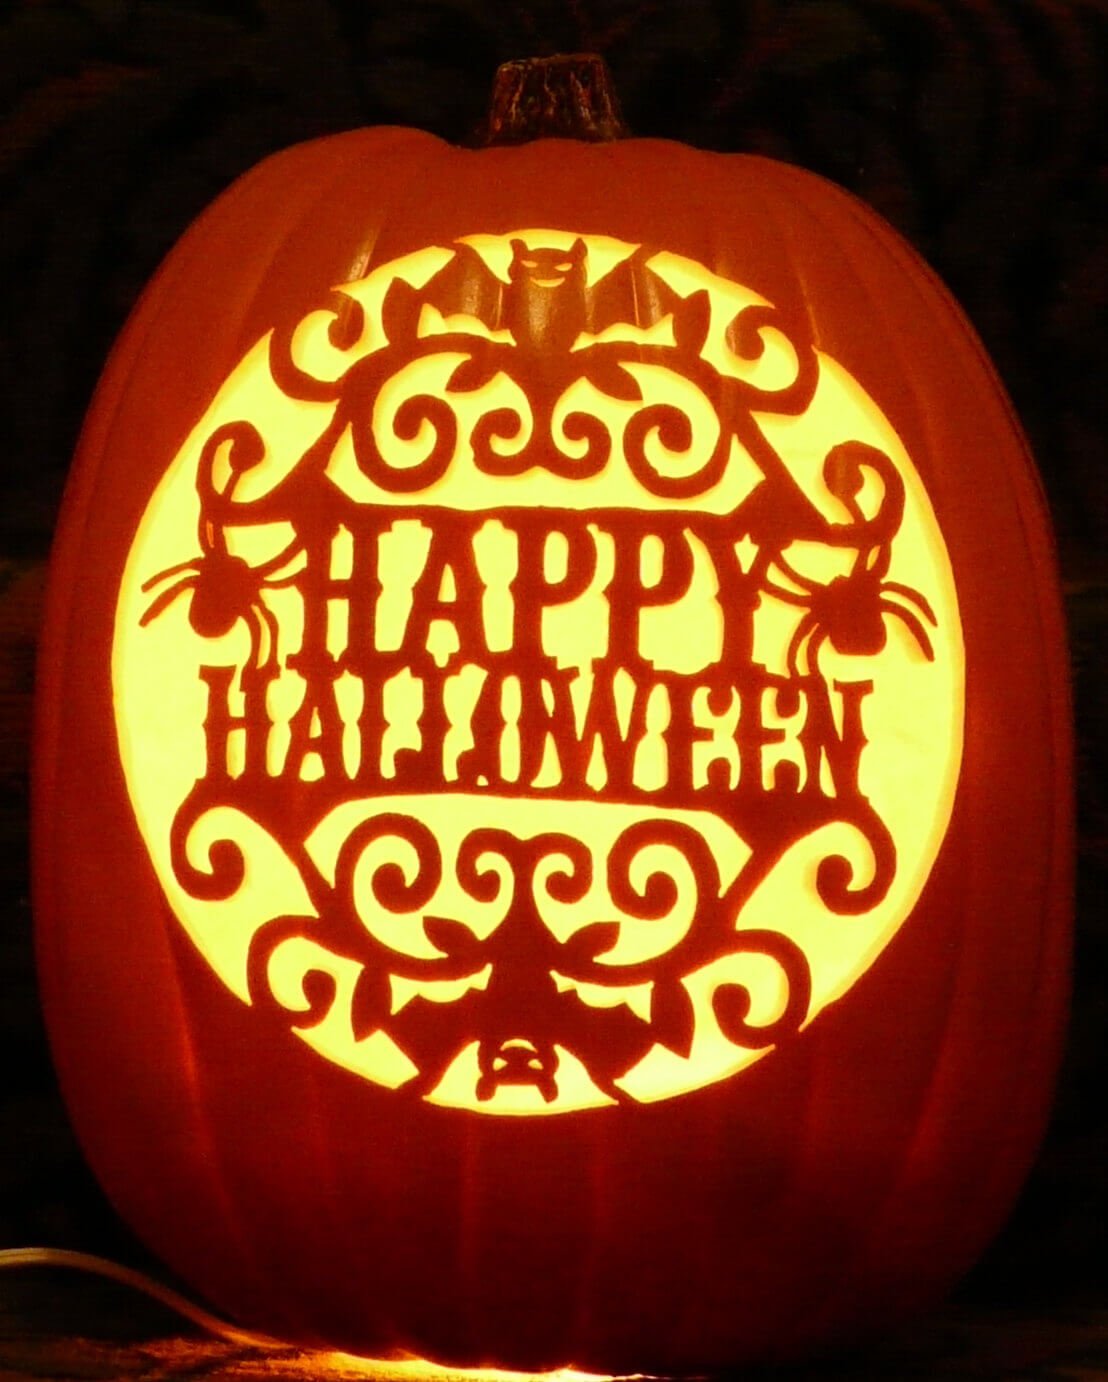
This intricate design is a little more difficult than some of the other Halloween decoration ideas on our list. However, you can choose any border to surround your Happy Halloween carving.
48. Monsters, Inc
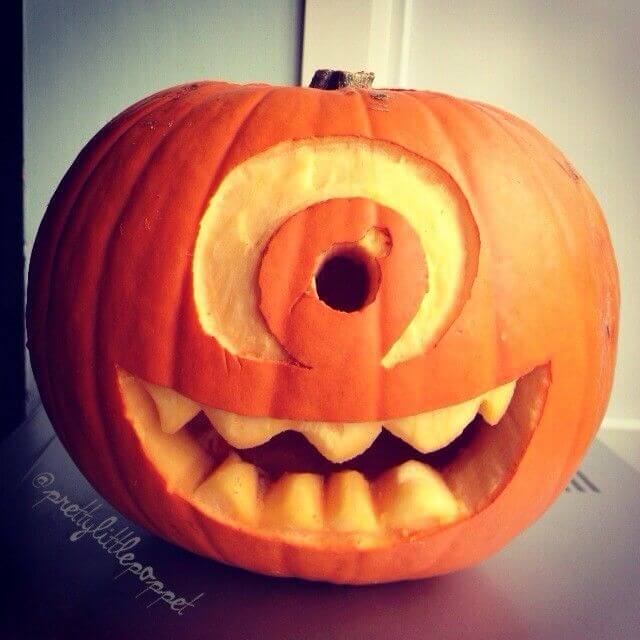

Take your monster carving to the next level with this Monsters Inc. inspired pumpkin. It’s pretty easy to create your own Mike Wazowski. You’ll just need the signature single eye in the center of the pumpkin and the pointy teeth. You could even get several pumpkins and create a whole range of Monsters. Inc characters this Halloween.
49. The Tree Of Life
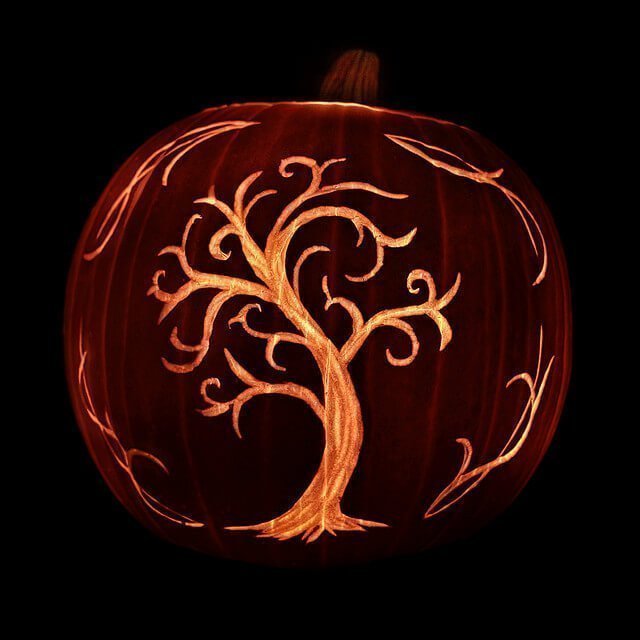
This is a beautiful image to carve on any pumpkin. Fall reminds us of trees changing colors and shedding their leaves, so it is a great design to use. A border around the tree will add even more elegance and beauty.
50. For A Plain Yellow Pumpkin To Become A Golden Carriage
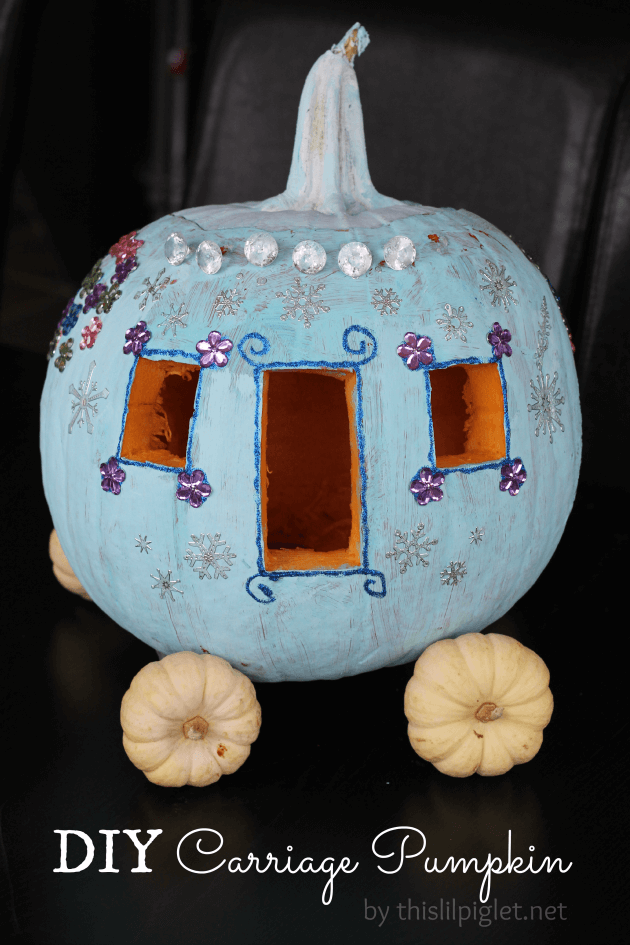
How cute is this Cinderella inspired pumpkin? The carving part is extremely easy. You just have to carve out a rectangle for the door and two squares on either side for the windows. Of course, you’ll have to put it on small wheels to make it look like a carriage. The last step is painting it!
51. LED Flashlight And Spikes
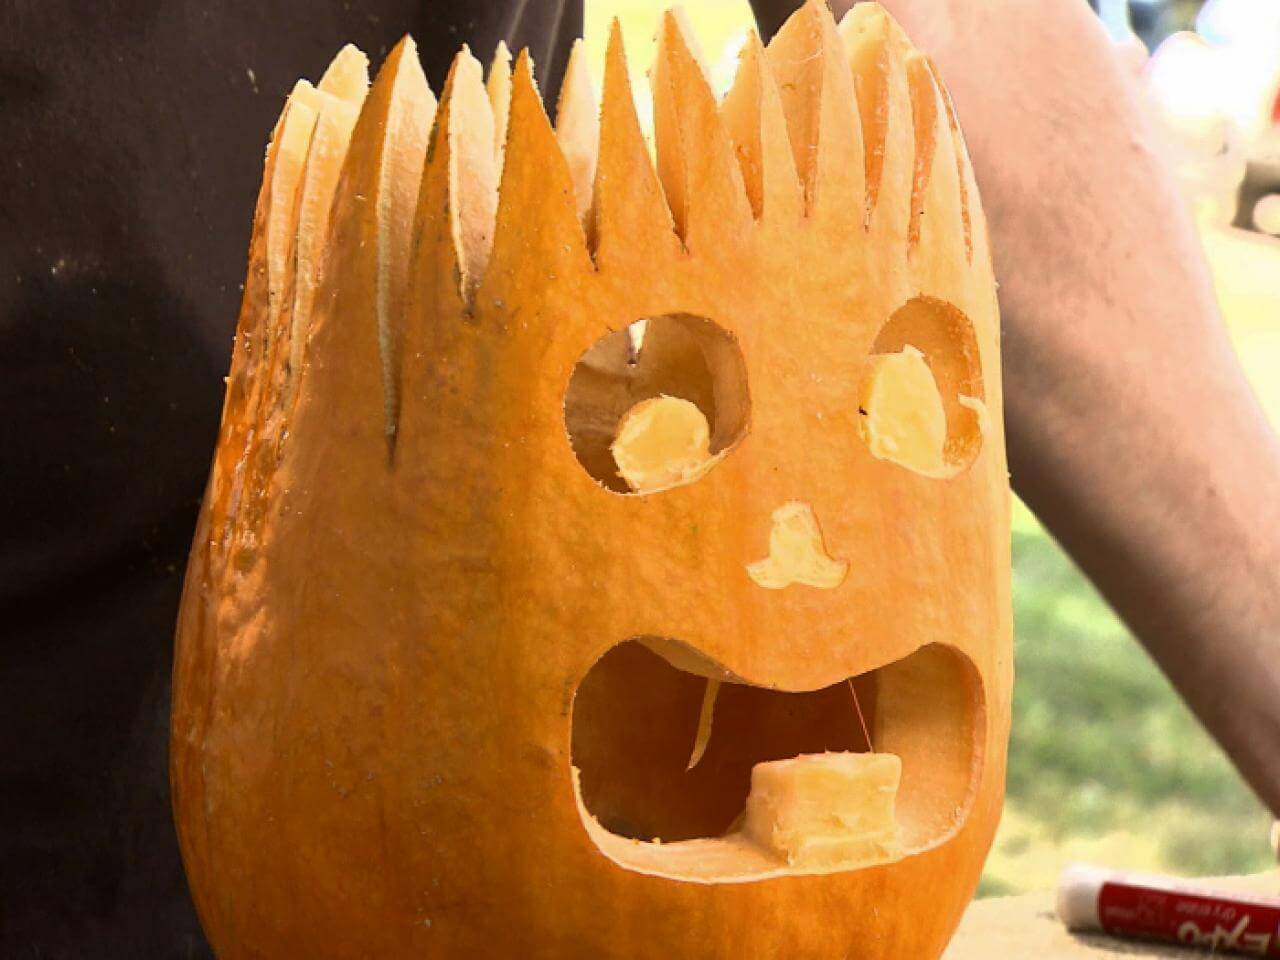
You’ll need to choose a tall pumpkin instead of a round, fat one for this face. Draw the spikes and the face before you cut the top off with a serrated knife. After you’ve scooped the pumpkin out, use your carving tool to cut the spikes and the face. Place the LED flashlight inside to light up the night.
53. Silly Face
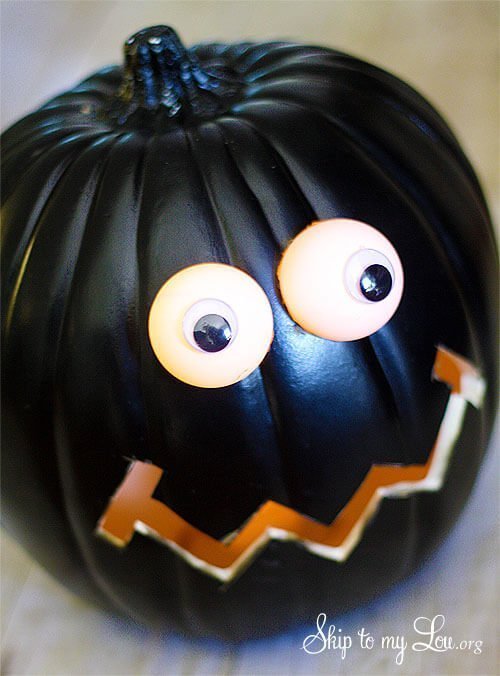
We’ll end our list with a silly face for you. You can use a foam pumpkin or choose a real one of any size and paint it. While this one is painted black, a bright color would be fun too! Stick on some googly eyes and carve a goofy smile, and you are ready to go!
It’s time to get started!
Now that you’ve learned how to carve a pumpkin, it’s time to get started. There is nothing more fun than creating DIY Halloween decorations, and these will look amazing in your home and on your porch. We’ve got a wide selection of pumpkin carving faces to choose from, ranging from cute animal templates to spooky monsters. If carving isn’t your thing, don’t forget you can always drill your pumpkin’s design or simply paint it. There are Halloween ideas for everyone in this list!